|
|
|
Building a DC Blast Gate
 |
 |
 |
 |
 |
 |
 |
Building your own blast gate for a dust collection system isn't hard. I've seen a few bad examples of how to do this in woodworking magazines however so I thought I would illustrate this simple design I use in my system. This example shows a gate being made for a 6" system but the principle is the same for any size of ducts. |
|
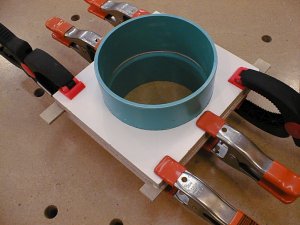
| There are a lot of materials one
could use to construct a gate. In this particular case I am using 6" pvc as the
connecting elements because that is what my ducts are made of. Instead of sections
of pipe I could have used a 6" coupling (cut in half) but using pipe made the size of
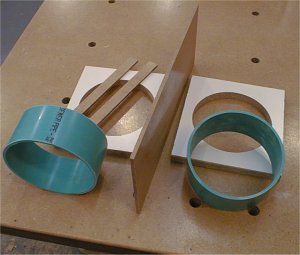
this particular gate smaller which was important for me. The major components are the pipe sections, the gate halves, the guides, (the thin strips) and the gate door. In this case I am using 3/4" Melamine for the gate halves and 1/4 tempered (important to use tempered) hardboard for the guides and the gate. The gate halves have been cut to size and an appropriate size hole for the pipe sections has been put into them. The fit for the pipe needs to be tight but will tolerate some gaps. |
 |
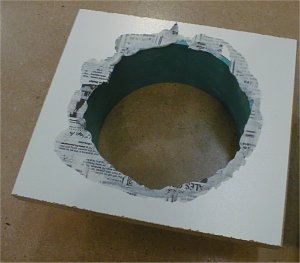
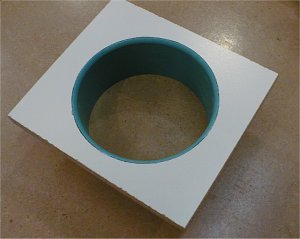
The pipe sections needs to be glued to the gate halves, Even though polyurethane glue isn't the strongest glue, I've always used it for this and have never had a problem. When gluing the parts together, lay down some newspaper on the glue line side so the entire assembly doesn't end up being glued to your bench. In order to get a good bond between the particle board and the PVC, rough up the pipe a little with sand paper and (of course) make sure it doesn't have any oil on it in the glue area. Polyurethane glue (as you probably know) expands as a foam when curing, this is good because it will fill any gaps between the pipe and gate halves. After the glue has dried you need to trim the interior face of the gate, I do this with a 1/4" roundover bit. PVC machines well so there is little danger of getting melted plastic all over the cutter. This will help the gate to move freely and it is done to both gate halves. |
|
 |
 |
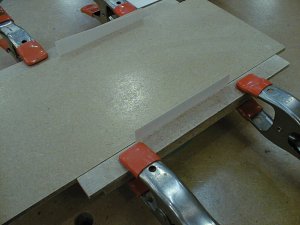 |
The easiest way to create a space
for the gate itself is to just space the halves apart by the proper amount. In this
case I am using the thickness of the guides (1/4") to control this.
Because of this, my gate material needs to be a little less than 1/4" thick to slide
in and out well, more on that later. In order to get a good bond between the Melamine and the hardboard I have roughed up the glue zone with some 100 grit sandpaper. In this view you can see the 1/4" material I am using as a temporary gate to set the proper distance between the guides. I set the gate onto one of the halves. Using this temporary spacer ensures that I get a consistent dimension between the guides in case I am building several of these. |
The order in which this
glue-up occurs is as follows:
It is important to NOT get any glue squeeze-out where it will interfere with the gate later. In this article I am using a process that does not require any screws or fasteners to make this blast gate. This is mainly because I am using Melamine. If one were using veneer plywood for gate halves, screws, brads, or staples could be used without any bad side effects so long as it doesn't deform the guides or otherwise interfere. |
|
The reason for letting the gate half assembly cure before going further in the steps above is so that you can inspect it before committing to final assembly and to lessen the chance that the guides will move on a larger glue-up. Remember that glue can be very slippery. Once the half is cured it is a simple matter to glue its other half onto it. In this particular instance I am using polyurethane glue to glue the guides on and ultimately the whole thing together. After the whole assembly has cured the guides can be trimmed up and the edges sanded if desired. |
 |
It is also important in a design such as this that the gate does not fit too snugly (thickness wise) between the halves. A snug fit may actually prevent a closed gate from being sucked up to the vacuum side to provide a good seal. I have found that a gap of 1/16" or more creates a very good gap. |
|
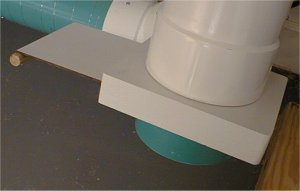 |
This particular blast gate (shown
installed) was attached to a wye fitting that is basically pointing down at 45
degrees. The gate is a piece of 1/4" paneling that is at least 1/16"
undersize on thickness and a handle has also been attached to it. The most common error I've seen in magazine articles that describe how to build a blast gate is that they close off one end of the thing. It is VERY important to NOT to do this. When this is done it guarantees that this pocket will eventually become filled with compacted dust and the gate will not completely close resulting in a pressure drop in the system. |
FAQ I've received a lot of questions about this article. In an attempt to explain these in more detail I developed the following FAQ. If you have some question or think there should be an addition here, let me know. |
|
How do you cut the round hole?
|
There are lots of ways of cut a hole. In Melamine and large gates (6" +), I make a rough cut with a jig saw and then freehand rout the hole to a line until I have a good fit. The hole may not be perfect but it doesn't have to be. On smaller gates, I may use a circle jig in a drill press but most often I use the first method. |
| Your design doesn't have a pull out stop, is that a problem? | The only time
I need a pullout stop on a gate is when I can't see or feel how far to move it. The
saw DC port on my Hammer is a good example of
this. Otherwise, I stop pulling the gate out when it is open. There are
several ways one could include a pull-out stop in this same basic design, I just don't see
a need for them generally. An easy way to integrate a pull out stop would be to lengthen the gate and include some kind of hole or cut-out on one end. A handle on this end would be the actual stop. So long as everything is sized right there should not be a problem but it will take more room to operate. |
| Why is important to use "tempered? hardboard? | Where I use tempered hardboard in this particular article, other materials can be substituted. If you are going to use hardboard though, tempered is a much better material since non-tempered hardboard is prone to delaminating. In this case with a glue joint holding the whole sandwich together, the assembly would be prone to breaking in half. |
| What do you use as a blast gate? | In this article, I show some 1/4" smooth white paneling material. In truth, the paneling isn't 0.25" thick, it's more like 0.18" so this leaves the gap to allow the gate to move freely. On smaller gates, I like to use 1/8" spacers and 0.09" aluminum. |
 |
 |
 |
 |
 |
 |
 |