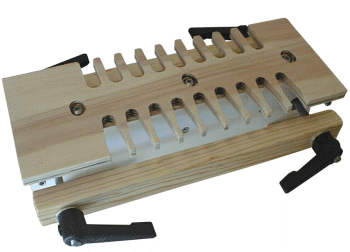
Making A Jig
The whole point of the Stots Dovetail Template
Master is to use it to MAKE a tool. There are actually many ways to construct a jig as
well as several considerations for materials and methods.
Template Material
Solid wood could be used as long as the grain is
oriented properly (running WITH the comb fingers) but the overall width (of an individual
section) should be less than 6 inches wide. A hardwood such as Hard Maple would be best,
preferably quarter-sawn.
The instructions indicate that plywood could be used, I do not
recommend common plywood because of the use of softwood for the inner plys. Baltic Birch
or something similar that is made entirely of hardwood veneers would be a far superior
material.
MDF could also be used, although the inner core of MDF is not
especially hard it would probably serve far better than softwood or common plywood. The
advantage that MDF has is that it is easily machineable and inexpensive. MDF of �"
thickness will be stronger and the material should provide a reasonable amount of service
life.
One could also make the comb out of phenolic. This would make for
a very durable jig, many commercial dovetail jig combs are made of this material. Phenolic
is a plastic lamination that is relatively easy to machine and quite strong. If phenolic
were used �" thickness is probably more ideal (and less costly) than �". The
disadvantage of phenolic is its high cost. I haven't tried it but Corian might be an
interesting choice of material, particularly if it could be obtained at low cost as scrap
from a counter top maker.
Template Thickness
The material thickness of the template has a very
important impact on the design of the system as a whole. This is due to two factors. The
first is a "strength of materials" issue. Mainly, the stronger the comb
material, the thinner it could be. For instance, �" MDF is not nearly as strong (or
durable) as �" phenolic therefore it might not be the best choice for the template
material.
The second aspect relates to the depth of cut required AND the
available cutters. Assuming one is going to use bearing guided bits, there are limitations
in the standard size cutters that are useable and the placement of the bearing relative to
the thickness of the template. For example, if the stock thickness is �" and the
template thickness is also �", the standard dovetail cutter would not allow it's
guide bearing to touch the template. In the situation above there are several common
options:
1. Make a thicker template that allows for bearing engagement and the proper cutting
depth.
2. Find a cutter with a smaller cutting height which ALSO allows a bearing to be used
(there are few if any).
3. Switch to using a guide bushing.
4. Increase the thickness of the router base.
5. Offset the stock in the jig by spacing it away from the template.
I want to make it clear that ALL template based dovetail jigs
that use bearing guided bits will suffer from this same exact dilemma. Different jig
makers have different official "solutions" for the problem but the problem is
the same. There are pro / cons associated with all the above solutions, here I'm just
pointing out the impact template thickness has on the system.
Template Length
The beauty of the Stots template is that you can
make a jig of what ever size you want, you are not limited or hindered like you are with
some other commercial jigs. For example, with a ready-made jig such as any of the Keller
dovetail jigs, you may find it a bit too long to run on the router table when used to make
small boxes. The Katie jig has exactly the opposite problem, it is smaller than one would
wish when used for case joints. Even the Keller Journeyman may not be as long as desired
for some case work. With the Stots you can make a range of templates to cover your needs
at a tremendously lower cost than these commercial jigs.
Most drawers and small boxes are probably less than 8 inches
wide. An 8 or 9 inch capacity jig will be easier to maneuver on a router table or clamp to
the workpiece if used freehand. Something of around 16, 18, or 24 inch capacity would
probably take care of most of your needs when used on case-work. For long jigs you will
probably prefer a wider spacing like 2 inches. A 12 or 14 inch capacity jig is a good
in-between size. It is large enough to be used on some case work and small enough to
maneuver on a router table. This size would also allow you to "double-up" small
parts (like drawers).
Cutting The Template
The instructions mention making starter holes in the
subject template material then plowing out the pattern using a bearing guided router bit.
I prefer to lay out the pattern on the stock then cut away as much material as possible
with a saw. The result is that when the router bit is used to complete the pattern both
the stock and the router bit have significantly less stress applied to them. I think this
noticeably improves the pattern accuracy and lessens the wear on the bit as well. The down
side to this technique is that it takes more time and more care. Just as when using the
jig to cut joints, the router should be run at some high speed setting.
I also think it is important to mention cutter placement. Ideally absolutely NONE of the
cutter would be in the area of the master template. Ideally the cutter and bearing are
exactly the same diameter. When a lot of side stress is applied to the cutter it is
possible for it to deflect. If the cutting portion of the bit protrudes into the zone of
the master template it is possible(even with the bearing) that it can cut into the master.
Although this may be obvious, it is also important to firmly fix the template and stock
during cutting. The template is fixed to the stock using two screws - make sure they are
tight! If the whole assembly were clamped to a bench it would provide a very stable
surface. Spacer blocks could be used to keep the bit from cutting into the bench. Remember
that it is important to cut as accurate of a copy of the master template as possible, all
these small suggestions help to do that.
Layout
Using the template master one can easily create spacings on multiples of one inch. For
example a two inch spacing would probably look a lot better on a large piece like a
blanket chest. The instructions describe the process. Spacings other than on multiples of
one inch can be made but it will require a bit more figuring out on your part.
I'm of the opinion that it would be best to stick with the "easy" layout options
(multiples of one inch) for fixed templates. There are well documented ways of getting a
true variable layout using a jig of this type so creating numerous iterations of fixed
spacings would seem to be a waste of effort. I do see value in having separate one and two
inch spacing templates though.
The master template is made with dovetail fingers laid out on a one inch spacing in an
offset pattern. I say the pattern is offset because a jig made in this "stock"
pattern would have the pins and tails board edges in different planes. This isn't good or
bad, it's just the way it is laid out
Another aspect of layout would be to create a template that is not "offset".
This would yield a jig of the pattern like the Katie jig with a pin finger centered on the
slot of a tail guide. This is actually very easy to do by routing one side of the jig,
moving the template �", then routing the other side. There isn't a great deal to be
gained by doing this and it does create an opportunity for error. I recommend either using
the stock alignment method mentioned in the manual or making an offset stop to compensate
for the offset stock placement.
The last aspect of layout I'll cover is that it is entirely possible to create a movable
finger jig very much like the Katie Jig; this would be more work though. However,
ShopNotes Magazine Volume 8, Issue 43 has a good article describing a process similar to
how this could be accomplished. I'm of the opinion however that if this is what is
desired, you should either buy a ready made jig that does that and more (like the Leigh)
or just go ahead and build the ShopNotes jig from scratch; ie: if you can imagine how to
do it using the Stots template you already have the skills to do it without it.
Alignment
All through dovetail systems (yes, even the Akeda) require some kind of alignment, the
Stots system is no different. First, it may be useful to know what causes a dovetail jig
to need alignment. Note that only the pins side of the jig needs fine alignment, the tails
side is gross enough to qualify as simple assembly.
1. Initial alignment. Most jigs (and of course the ones you build) do not come fully
assembled thus the parts that form the critical relationship between the reference face of
the stock and the position of the "wedge" shape of the tail section of the guide
template are not in the proper relationship.
2. Cutter change. If one cutter were used during initial alignment, it is possible that
another cutter (or a re-sharpened one) could be just a little different even though it has
the same catalog specifications. If the differences are big enough (a few thousandths) it
can cause a difference in fit prompting a re-alignment.
3. Stock density / hardness. Even a change in the workpiece has a small effect on fit,
this is due to differences in the compressibility of the wood fiber. The best example of
this is the change from something like Hard Maple to Pine (a softwood). A joint that goes
together with moderate hand pressure in one specie may produce a fit that either needs a
mallet to join or is a bit "loose" in the other species; this is an easily
observable phenomena.
4. Stock width. Although it doesn't affect the individual pin/tail fit, the wider the
joint the more opportunity for an interference fit situation. To illustrate, consider that
the odds of success when assembling a 2" wide joint that is tight are much greater
than on a 24" width of the same tightness. Meaning that on wide joints you may wish
to have a looser fit than on smaller ones.
5. Backer boards. In the common #1 and #2 designs of a Stots-made jig the important
consideration for the backer boards is that their thickness effectively controls the
relative position between the workpiece and the template - which is in effect alignment
(in this sort of design). Meaning, that if the backer board thickness changes (on the pins
side) by even a small amount it will affect the joint fit.
The alignment described in the instructions is really the same as
those used on similar jigs such as the Gifkins, Katie, or Keller and effectively others
like the Leigh although it may not look like it. Through trail and error test cuts the
pins (or pins side) of the template is moved relative to the backer section of the jig.
The Stots instructions provide a good starting point for this alignment. After the first
test cut or two you are into the domain of alignment #3 & #4 above and are presented
with a decision to make.
Do you:
1. Align for a "best compromise" fit between hardwood and softwood and or joint
width.
2. Create a separate "loose" and "tight" (pins) jig.
3. Create some form of method that allows one to minor adjust the template to compensate.
The decision above is somewhat predicated on what you consider a "good fit".
Consider first though that there is another factor affecting fit - glue; because glue
takes up space. For example "gap filling" glue with a high solids content will
make a looser joint go together more tightly. For joints that are already tight, chair
glue (which is about as thin as water) has the ability to wick into the joint that would
otherwise be starved.
In alignment, the first real issue I believe is the
tedium of the trial and error process. To make this a much more controlled, I install two
small blocks on one side of the template; these accept small #10 jack screws. With these
it is possible to adjust the template in fine known & repeatable increments to the
desired level of "fit". Using these devices it possible to easily implement
whichever of the decisions above are selected.
Using The Jig
The whole point of making a jig is of course to use it. A
Stots-made jig can be used for making evenly or variable spaced through type dovetails
quite easily. With a little more effort, variable size dovetails can also be made. In
addition, a half-blind effect can also be achieved.
Reference
Actually using the jig it somewhat anticlimactic after having built it; this is mostly due
to it's ease of use. There are two common methods for lining up the stock to be cut using
a jig like this. The first method (I'll call Mark Reference) is to position the tails
joint by eye, cut the joints, and position the the pins joint to match it (this is
described in the instructions). This works fine for a few joints or if you are doing a
true variable layout.
The second method (I'll call Edge Reference) is to use some form of stop system. The stop
can either be immovable or allow re-positioning to be done. A stop system worth using will
locate both the pins and tails boards. This is fairly easy to accomplish on a jig that has
both pins and tails sections, not as easily on separate pins and tails jigs.
An important consideration for template dovetail jigs is what guides the router. With a
Stots-made jig it is possible to use either a router mounted guide bushing or a bearing
guided bit. The problem with using a guide bushing is that it may not be exactly centered
on the cutter. This can result in a joint where the edges do not line up perfectly. A
bearing guided bit does not suffer from this phenomena.
Bearing guided bits also seem to require less effort to guide and they are more accurate.
The down side of a bearing guided bit (in these template based jigs) is that the stock
thickness and template thickness have an interaction.
Tearout
Tearout is a common problem on many through dovetail jigs, both on the front and back, a
Stots-made jig is no exception to this. The remedy is the use of a sacrificial board both
in back of and in front of the stock. Backer boards are commonly used, fronter boards are
not.
In addition, technique can also play a part. When cutting it is preferred to use a
"climb cut" action, this tends to reduce tearout a little. On a standard Stots
layout, this technique is possible on the pins because there is room to maneuver the bit
side to side. For the tails though this is not possible, there is no side-to-side movement
allowed - you have no choice but to go straight in and out. It is possible however to
orient the stock so that the tearout will only (hopefully) occur on the inside of the
joint where it will be less visible. A very important aspect of preventing tearout is to
use sharp bits as well.
|