|
|
|
 |
 |
 |
 |
 |
 |
 |
Dimensioning - Part I The world is built off of dimensioned 2d drawings. Even in
today's world of 3d virtual reality design, parts are made and checked against 2d
dimensioned drawings. Fortunately for woodworking, dimensioning isn't too complicated due
partly because of the way projects are built.
|
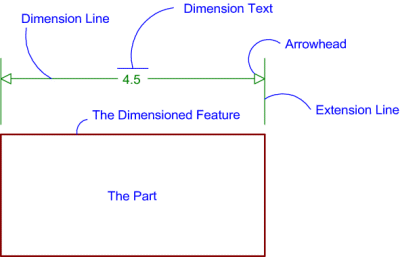
| Parts of Dimensioning There are basic accepted components of a dimension. If one uses the dimensioning feature of the software it will automatically include these components. If the drawing is manually dimensioned, they need to be included. The format is common sense so it isn't difficult to figure out. |
 |
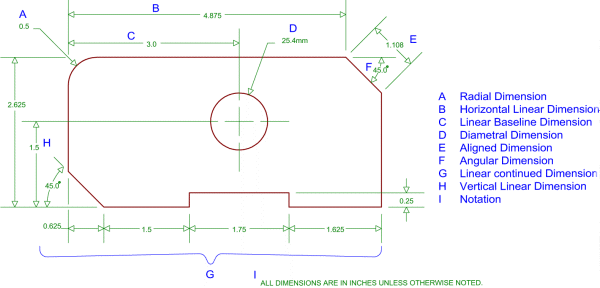
| Using Dimensions In order to be useful, dimension lines need to relate to a "feature" of a part; this involves the "type" (in this case "Basic") and the style. There are basic common sense rules for using dimensions but unless one is already familiar with drafting, they are not all immediately obvious. One likely good source of information related to how dimensions should be applied is in the CAD software manual itself. It should at least describe all the types of dimension lines used by the program. |
 |
| Style Dimension style deals with the particular type of dimensioning format used in every minute detail. In the real world dimensioning style is a very important issue, for a hobbyist, it is much less important. There are two levels of dimensioning "style", the first level is how the software displays a particular dimension (ie: filled / unfilled arrow heads, number in-line / above and many other specific aspects). The second level is how one uses dimension lines and draws dimensioned parts. An example of this is how to draw a frame and panel door in a shop drawing. The door can be drawn and dimensioned "exploded" or assembled. As long as all the information is present, there is no particular "right" way of doing it. Only when the information isn't there or it's difficult to understand is a drawing dimensioned the "wrong" way. The exception to this is that if a particular tolerance needs to be held but is not met with the dimensions given. FYI: The reason Dimensioning and its style is so important in the real world is that an organization wants to maintain a consistent standard of how dimensions appear. Many organizations have detailed style guidelines and rigorously enforce them. The dimension settings features of production CAD software has a bewildering array of settings that allow these organizations to set and replicate a style to match their "standard". Tolerance Tolerance is the location precision needed for any given "feature" of a part. Everything made by man has a tolerance whether it is unknown, big, small, variable, displayed, or not. A good example of tolerances applied to woodworking is in a frame and panel door. The panel can be no wider than the assembled frame will allow for but not so narrow that the edges show. Since wood can change in dimension depending upon moisture content and temperature, it is important that the dimension of the panel be properly sized at the time of manufacture. Part I
Part II
|
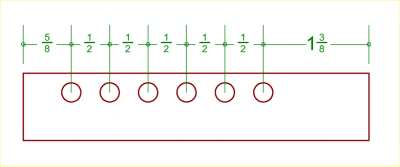 |
In the dimensioning example to the left, the holes and two ends of the part are dimensioned by showing the distance between features. All the features are located correctly but using this method opens the door for positioning errors when the holes are laid out and the part is made. |
| That is because each feature shown is referenced off
of a preceding dimension instead of a common point. If any of these holes are
mis-located, any hole after laid out subsequently will also be mis-placed. Even
though this part is dimensioned correctly and only Basic Dimensions are used, the way it
has been done can lead to tolerance errors when it is made, in this case a
"stack-up" error. There is nothing preventing the maker of this part from adding the distances given in the example above to arrive at a base-line position dimension (as shown below). However, when a manual math operation is introduced into the process, it can convert a correct (but inconvenient) dimension into a human error. |
|
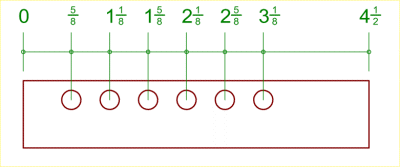 |
Here is the same part but a different type of
dimension line is used. This time the features are all referenced from a common
point (zero). If the hole at 1 5/8 were laid out incorrectly, none of the other
features would be affected by this error. Whenever possible, this is the way
multiple dimensions should be used. Note there are more ways to display this type of dimension line than shown here. |
| Summary This chapter is only an introduction to the topic of dimensioning. As stated earlier, dimensioning is a science unto itself and volumes could be written on the subject. The main thing to know about dimensioning is that they need to convey the required information in a clear manner that will tend to reduce errors instead of introducing any of its own.
|
Back to the Woodworking With CAD Index
 |
 |
 |
 |
 |
 |
 |