|
|
|
 |
 |
 |
 |
 |
 |
 |
| Style The "style" in this case refers to the furniture style meaning basically what do we want the project to LOOK like. More specifically, building upon the established Contents and Framework while keeping the Constrains in mind, we now want to design the exterior of the project. This next concept is more important than it appears - we ONLY want to consider the style and layout of the project - NOT how it is built joint by joint. While you could consider joinery at this stage it will be easier and faster if we wait for the appropriate time to do this. |
| This phase goes pretty quick initially
if you have a library of elements that can be quickly applied or better yet drawings that
you can easily modify or rob elements from to produce these new designs. This is the power
of CAD in it's most obvious form. At right you see a close-up view of a section of the project drawing. Here I've drawn basically a shell of a bookcase over the top of the Constraint, Contents, and Framework. This is really just a rough sketch at this point. If you remember, these elements together make up what we would now consider the "Second Constraint". Many From One |
 |
| We will also consider it
an option to reconfigure any of our previously drawn core elements except for the
Constraint if we need or want to. For the sake of expediency, I've drawn an
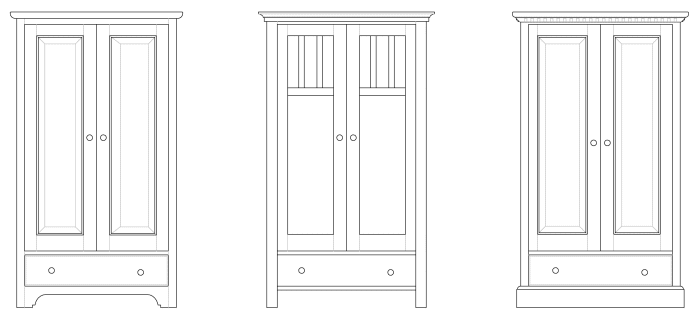
archetype of each of our three styles over the top of copies of our other elements. These
new elements are of course on a separate (new) layer I'll call "Style". In this view I've combined the three styles into a single illustration in order to more clearly see what we are after here. To see these views in the drawing the other layers would be turned off in order to more clearly visualize the style aspects. After you have successfully "wrapped" the Second Constraint, it is easier to work on the details of the style with all other layers turned off. We probably don't want to get too wrapped up in minute details as of yet, just fundamental details we need to make a final style selection. |
|
|
| One should not get caught up exactly where these things are in the drawing just so long as they are relative to themselves as required. Remember, we are drawing on infinite planes and multiple layers - we could be anywhere. |
| Tweak Tweak This stage is probably the most fun, it is here we tweak away at the design(s) until we get something we think will work and looks the way we want it to. If the design isn't very focused or constrained you might spend quite a bit of time here developing style variations or competing layouts. |
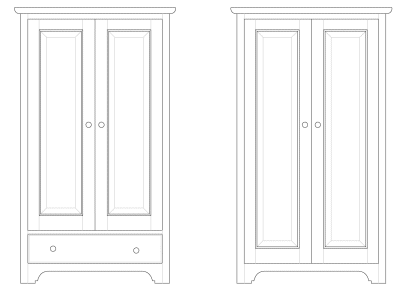
| For illustration purposes I'm going to say that
after seeing a fully scaled design thus far I'm thinking that the drawer that holds the
CD's looks a little clunky. There really isn't anything I can do about the size of the
CD's and to lay them flat in the drawer (to reduce its height) isn't recommended so I'm
going to explore another option, I'll put them behind the door. Here is a before and
after picture showing this effect on one of the three competing styles: So I've placed the drawer on the inside but basically where they were originally. I really haven't changed the proportion of the drawer though but I have changed what the project looks like from the outside. |
 |
| This latest revision has opened my thinking to other possibilities. There really isn't any requirements that the drawer be on the bottom, what if it were on the top instead? Also, I think I want two drawers instead of one big one. Note that these changes did not impact the exterior of the project so it remains the same as shown above. |
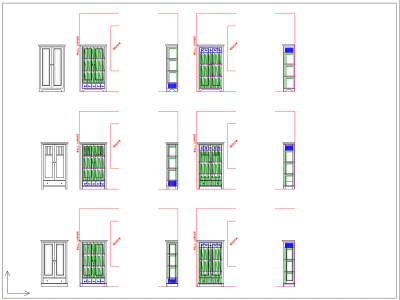
| So here I am, I've got three competing styles and
two competing layouts. I could keep this up for a very long time but lets say that this is
as far as I want to go, I'm going to select one of these designs for further development. Shown here is a representation of what my entire drawing might look like at this point (this is a birds-eye view). I've got all the previously drawn elements in as may copies as I need in order to flesh out the details at this stage. You might know by now that exactly where on the virtual drawing planes these drawn objects are located is not important, only the relationships within a group are important. |
 |
| The Reality Barrier At this point we have approached an unbreachable boundary of our software. In this article I've shown some simple line drawing with the extraneous detail hidden in order to get an idea of what the project would look like. The boundary I speak of is that we cannot fully conceptionalize what this will look like sitting in the room. Even if this were a full color life-like rendering, it still will never convey the sense of scale that one gets from a full size three dimensional real world object. I can't really tell you how to make a selection at this stage. If you are doing this for a client you have to fully explain what the pictures convey and they will decide. If you are doing it for yourself, you have to fill in the gaps and make your own decision. The thing that really turns this particular phase into fun is being able to operate the software fluently; having some pre-drawn elements to speed up the process should make this even quicker. This allows you to spend more time thinking at the design than actually drawing it. |
Back to the Woodworking With CAD Index
 |
 |
 |
 |
 |
 |
 |