|
|
|
 |
 |
 |
 |
 |
 |
 |
| Impressions This description of the Jet JPM13 planer / molder takes place a few years after I made the purchase, as such many of the purchasing issues are no longer fresh in my mind, the current model of the machine has changed slightly since I bought mine as well. I bought the planer when Jet first came out with them. At that time, there was nothing in between the 12" "lunch-box" planers and the big 15" jobs. This machine fit right in between these. Delivery |
 |
| Assembly Common of open stand machines, the stand must be assembled by the owner. Also common is the large number of bolts and associated hardware that goes into assembly. Half of the 3hr assembly and setup was spent putting the numerous stand parts together. Other than being tedious, the assembly was easy and straightforward. Overall, the fit and finish of the machine is good, no obvious defects or un-deburred edges. One aspect was fairly noticeable however; because I bought a Delta DJ15 (made in Taiwan also) at the same time, it was obvious the Jet was using bolts of noticeable inferior quality. The bolts and other hardware function, they are just worse than you could buy in any hardware store. The documentation is complete and of about average quality or a little above. Operation With sharp knives the cut quality of the planer is excellent, the unit is capable of feeding stock at 10fpm and 20fpm. With just-sharpened knifes the difference in surface quality at either speed is almost unnoticeable and still excellent. After the knives have a fair amount of use the quality is more noticeably better at the slower feed rate. The feed speed change is accomplished by swapping the position of two gears easily accessed on the right side of the machine. I leave my machine set at the 10fpm rate for three reasons, mainly because these gears can be difficult to swap. There is nothing inherent in the design that makes this so, it's the execution. The gears fit onto shafts with key-ways, the keys are little loose-fitting parts, not part of the shaft or gear. Because these keys fit loosely, they can bind a little when torque is applied which makes them jam the gear / shaft somewhat. There is also an idler gear in this assembly. When the unit was newer this idler was prone to moving out of position thereby stopping the feed. By leaving the feed rate in one setting this problem hardly ever occurs. The three knives are held in place on the cutter head by jam-blocks with set screws in them. The knives are adjusted using jack-screws. A simple set-up gauge is included as well as a brass rod to tap the jam-blocks loose. I was somewhat skeptical of the set-up gauge when I saw it but this is all I have used when setting the knives and it allows them to be set pretty well, well enough that I don't have any compelling need for more sophisticated tools. The knives seem to hold an edge well and don't nick too easily. I've re-sharpened the original knives several times, they are pretty easy to get at, remove, and reinstall. After about the second time, it is pretty routine. The bed raises and lowers for the desired thickness as opposed to the cutter head. The table is moved using a crank on the top of the machine, the table is guided by four posts. The operation when new is very easy, the indicator isn't too precise, it's just a coarsely printed tape and pointed indicator. The unit can be relied upon to give consistent thickness cuts to the measurement indicated within a few thousandths of an inch, good enough for me. The bed does not have rollers like the bigger 15" machines, for that reason it is good to keep the bed waxed. Dust collection is okay, a separate hood is offered to connect to a dust collector, it is not included with it. I made my own hood and the dust collector I have is a little underpowered for this machine. Even so, I believe there is an inherent restriction in the primary hood itself. This is most noticeable when planning wide stock such as Soft Maple or Pine and the chips are full width, the exhaust clogs somewhat. Aside from some annoyances, the machine performs well. To date I have run quite a bit of stock through the machine. The depth limiter prevents a deep cut and the motor powerful enough for most tasks. Overall I've been pretty happy with the machine. Service Recently, I had a serious problem with the machine, I had one of the drive sprockets break which in turn caused considerable damage to the gear box. I had trouble getting a new gear box but not the individual pieces. I am not certain if the problem was with the local dealer or the Jet warehouse itself. In any case I was able to obtain the required parts and make repairs. Due to the exact nature of replacing the damaged parts, replacing an entire gear box would have been the preferred (but more costly) method. I still do not know what caused the failure of the sprocket, I've got a lot of hours and lineal feet on the machine but it didn't look like there was anything about the sprocket itself that would have induced the failure. With the whole unit disassembled, I was able to inspect the gearbox. Although it apparently works, the bearings are mostly bronze sleeve types. One of these that held a shaft that was bent was obviously worn to beyond the point it should be, it is possible this was the root cause of the failure. Further inspection revealed that the grease in the gear box was basically the consistency of moist dirt and of very low quality and quantity. There couldn't have been much lubricant for the gear box. When re-assembled, I installed a grease fitting on the gear box and filled it full with real grease. Summary I still think this machine is the best of those that fill this niche between the universal motor "lunch-box" planers and the big 15" jobs. I'm not aware of any design changes to the unit in particular the gear box or feed gears but there may be some by now. The most current models are now offered in a closed stand which would be nicer. I'll make this conditional recommendation, the unit is good if maintained but be aware that there could be problems with the gearbox later in life. I can only recommend this machine because I don't know of any better in this price / size class and I do not know that the 15" planers are made any better. Modifications |
|
 |
This is a view of the right side of the machine with the side
sheet metal covers removed. The threaded rod in the center is attached to the crank
which is what controls the elevation of the bed. The two larger gears visible are the ones that must be swapped to change speeds. The smallest gear on an arm is the idler that transfers power from one gear to the other in either position. These three gears are accessed via a port in the sheet metal sides. |
| This is a view of the same side of the machine but the top with
the cutter head is removed as well. The four posts guiding the table are separate
removable pieces as well. The bed can be removed if desired by cranking it right off
of the posts. The little sheet metal piece on the far end is a guard for the drive
belts. The four holes in the bed are to attach jigs associated with the molding operations. There is an infeed / outfeed accessory available that bolts directly to the bed, two of the tapped attachment holes for this accessory can be seen on the side of the table. |
 |
 |
This is what is under the base. The two sprockets are attached to the threaded elevation rods. It is possible to get the threaded rods a little bit out of sync especially if you have to disassemble the machine. The way to get them back into sync is to loosen the set screws on the sprocket until they are matched up then re-tighten them. |
| This is the underside of the cutter head. On the right end
is the double pulley drive, on the left is the gear box that drives the feed rollers. Both the feed rollers are rubber coated. I did have concerns about this covering when I bought the machine. I thought that over time these would get chewed up by sharp edges of stock but these have worn quite well and now I believe my concerns were unfounded. |
 |
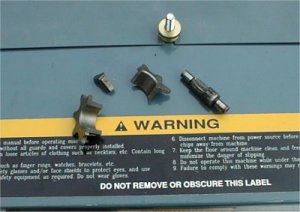 |
This view shows some of the broken parts. Three of the pieces comprise one of the drive sprockets. The other is the drive sprocket from the motor. The teeth are stripped on it but I believe that was a result of the failure I had, not the cause. |
 |
 |
 |
 |
 |
 |
 |