|
|
|
 |
 |
 |
 |
 |
 |
 |
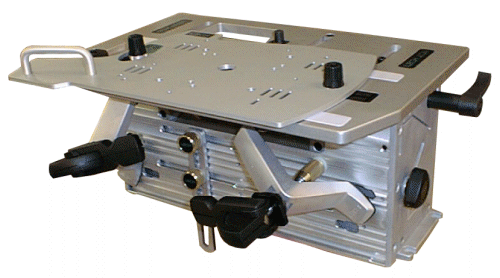
| Description The Leigh Frame Mortise and Tenon (FMT) jig is used to cut both the mortise and tenon (M&T) for this standard woodworking joint; it cuts a rounded mortise and tenon as well as some similar joints too. |
 |
| It may not be obvious from looking at the pictures
but the top section of the jig (not the router sub base) is an X-Y table. The main use of
the table is to align the template guides relative to a mark on the work piece. Imbedded
in the table is a clever sliding cursor that is used for this alignment. The table has a
stop system built into it as well to use when one needs to set limits on any X or Y axis
movement. The base of the jig consists of a frame to which a clamp plate is attached. The clamp plate can be set at any angle from zero to 30 degrees relative to the cutter. The clamp plate has several t-slots to which the clamps themselves are attached. In addition, a wide vacuum port is built into the clamp plate, it can be attached to a shop-vac via a connector in the back. The clamps are cam actuated and hold the stock very securely. The jig is constructed mostly of heavy gauge aluminum and is quite substantial and sturdy. Many of the parts are machined and the fit and finish quality is quite high. The table and router base plate combined add 0.75" to the router thus the depth of the mortise is limited but cutting length of the cutters themselves are probably going to be the ultimate limitation. The standard 5/16" cutter can do about 1.25" no problem, this should be fine in most situations. When clamped to a workbench, the maximum stock length (for tenons) would be around 40 inches or a little more. This ought to accommodate most of the stock in need of a tenon, if not, the jig could be elevated. |
|
|
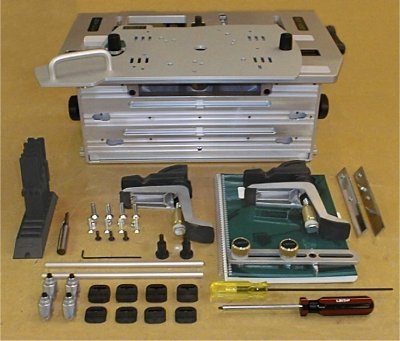
Assembly There is actually very little assembly involved. Assembly mainly involves mounting the router to the sub base. The jig can be bolted in place permanently or a board can be attached to the bottom allowing the jig to be easily clamped to a work bench. The jig accommodates a wide array of routers. The router can be screwed to the sub base or mounted using the edge guide rod holes most routers are equipped with. This last method allows for fairly easy removal and replacement if this is required. In either mounting, a centering mandrel is used to ensure the router is installed in the correct position. I used the guide rods to mount my router; I wish a couple of my other router jigs used this method as well. |
| After the router is installed onto the sub base, all there is left to do is attach the clamps and set up the system. I initially set the system exactly as described on page 45 of the manual. All this amounts to is setting two the tapered base pins. The initial setup was quite easy if not even anti-climatic; my very first joint in Pine was right on! From the original setup, I've only deviated from zero to plus half a turn on the adjustment from soft to hardwoods and have a hunch that this is all I'll ever need to do. |
| Manual
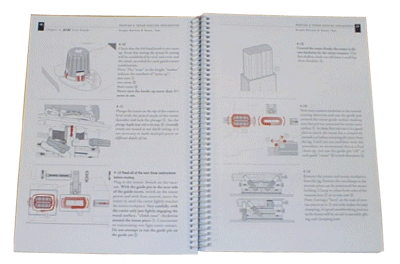
The manual is exceptional in its quality and clarity, just as one would expect of Leigh. It follows a style similar to their dovetail jig; basically a drawing with an accompanying short description to guide one through every aspect of using the jig. It would be hard to imagine better documentation for a woodworking tool. Leigh manuals are the standard example cited for excellence in this regard; unfortunately, too few others even come close. |
 |
| In Use
The jig is remarkably easy to use and fast acting to use. The sub base glides on some Teflon pads and is very easy to move around. I used dry-lube on the moving parts of my jig but this really isn't required. The router sub base is not captured by the jig, it lifts right off for a clear view. For a standard M&T joint, one simply marks the center of the joint on both work pieces. If multiple work pieces of the same size are involved they do not need to be marked. Once the table is aligned to the mark and the appropriately sized template is installed, the work is simply clamped and cut. A single template is used for both the mortise and tenon, each joint is cut separately though. The left and right guide pins allow the joint to be adjusted for as tight of a fit as one would want. Thus far, I've found the need for adjustment of these parts to be quite infrequent. In fact, I could probably just leave them at one setting; it is nice to have the adjustment capability though. |
 Optional templates and bits |
The FMT is capable of M&T work on a wide array of stock
sizes. It is not capable of putting mortises in a wide field however, Leigh has
another jig for that. It is capable of doing some rather small and fine work. I have
seen the dollhouse ladder they show in the brochure in person (and it is impressive), the
manual even shows how small work of this type is done. Using the supplied 5/16" bit and templates, one can produce quite a few useable sized joints. When the table is allowed to move in the X axis this range can be expanded a bit further. If other sized router bits are used the joint size selection is further broadened. When the additional templates are added to the above, the size of the joints is even further increased. Dust collection is pretty good, the opening in the face of the clamp plate is 7.5 inches wide. This can cause some support issues when clamping stock; mainly mortises near the ends of the stock. To overcome this one can either use over-long stock (not a bad idea anyway) or use an adapter plate to support the stock. |
| Tenons When cutting tenons the left guide pin rides on or away from the outside edge of the template, this makes it relatively "free" in most situations. For tenons, a climb cut is recommended around the perimeter on the first pass. This makes a very nice ledge with no tear-out. A normal (counter-clockwise) cut can then be made to complete the sizing of the tenon. Mortise When cutting the mortise, the left guide pin rides inside a slot in the template. Except for the free-play the guide pin has been set for, this is basically constraining the router to a simple left-right movement. The manual recommends making a series of overlapping, full plunge cuts along the mortise line and then plowing out what little is left in another pass. This technique keeps the mortise straight; if the mortise were plowed all in one pass or even in progressive steps, the torque of the router might cause the mortise to be at a slight angle. This isn't an FMT specific phenomena. Advanced M&T In addition to simply moving the table and adding bits and templates to alter the size of the M&T, multiple side by side and edge by edge tenons (or a combination of both) can be made. Since the jig uses a single template to produce even these joints, a technique to keep from routing into unwanted areas is employed. Basically a set of shop made spacers or "guards" can be used to limit the travel of the router when doing the tenons. Again, the manual outlines how to do all this in a very clear manner. As you might suspect, when you increase the joint complexity more care must be taken to ensure you have the right reference face of the stock against the clamp plate and stop. This would be true of any jig or even hand layout for that matter. In addition to multiple M&T, the jig is also capable of cutting bridle, haunched, and through type M&T joints. The same templates are used in every case, the difference is in the technique used to cut them and again all this is explained in the manual. The FMT can also produce all its joints with an offset or set-back if desired. Through type joints are rounded just like the other M&T joints. In this case you may run into a cutter depth issue but it may be possible to cut the mortise from both sides to get all the way through a thick piece. I think with a little imagination and hand work one could produce a true square end tenon for Mission style pieces, or you may find the rounded exposed tenon style to be just fine as-is (looks fine to me). I didn't try it but the jig is also capable of producing dowel joints. Summary
The FMT is not an inexpensive tool but it does deliver on its promises of ease of use and accuracy. With the FMT both basic and complicated M&T work can be done with the simple application of different techniques. If M&T joints are a big part of your work, the FMT will certainly help you do this with a lot less hassle and time. If you do not use this joint much, the FMT will certainly change that. |
|
In the interest of full disclosure Leigh provided this product to facilitate this review.
|
 |
 |
 |
 |
 |
 |
 |