|
|
|
 |
 |
 |
 |
 |
 |
 |
|
Impressions I bought my Leigh jig at a woodworking show after considering all those on the market at that time. The primary reason I bought this jig over the others is that I thought this would do all the dovetail joints I would ever want to do and do them well. The technical knowledge of the demonstrator reinforced my decision as well. If one has the opportunity to see the jig demo'd at one of the woodworking shows it is well worth the effort. |
| Assembly There isn't all that much assembly to do on the jig and the instructions are clear, it took about an hour for me to get it together and set up. None of the parts for my jig were missing or damaged. Not included with the jig are any guide bushings required; only two bits are included which are for the most widely used through dovetail size. At the time of purchase it was suggested to buy a �" 14 degree cutter for half-blind joints as well and I did this. Leigh also recommend building a platform for the jig to be installed on and I built one of these. Description The Leigh is more than just a dovetail jig, it's a template system. The machine consists of a platform with two adjustable height arms to hold the templates, two clamp bars operated with cams, and the template. There are several templates available other than the dovetail template that comes with the package. This template will cut both through and half-blind dovetails up to 24" wide. It will also do sliding dovetails and box joints. (disclaimer; I have never tried to do box joints with the machine nor have I heard of anyone who uses THIS template to do so). Other templates are available, the most useful being the mortise and tenon and the box joint templates. There are some more that allow the cutting of some special and very unique joints as well, I've never used anything other than the dovetail template. The most notable feature of the jig is its use of adjustable width and spacing template "fingers". Most dovetail jigs have fixed spacing and pin size, this usually means the stock must be sized in some multiple of a base unit (7/8" for most HB jigs) in order to get the joint to look right. With the variable spacing of the Leigh, those restraints are largely gone. For example, if a drawer width is some non-multiple like 5 7/16" wide, you can make sure there is a half pin at both edges, other jigs would fail here. One outstanding feature of the jig is it's manual, it is widely regarded for its clarity and quality. I would go a step further and state that this is the best manual I have ever seen for anything. The manual is spiral bound so it will lay flat on your workbench and made of good paper stock. The description of how to use the jig is mainly pictorial with accompanying descriptive text. This manual exudes excellence and clarity. One often overlooked aspect of the jig is that if any of the template fingers become damaged, they can be replaced individually; a pair would cost about $10. Many other jigs would require the entire "comb" to be replaced. The Leigh is designed to run with eight degree cutters for TD joints, these cutters are available in �" and �" shank sizes depending upon the diameter. There are also 8mm shank cutters that according to many reduce "chatter" and in general are better than the �" shank bits because they are stronger. All the cutters are available through Leigh and several other outlets as well, even the 8mm shanks. These 8mm cutter will fit into a �" collet when a reduction sleeve is used. I haven't used the 8mm cutters in the Leigh but have in other jigs, it does seem to reduce chatter a bit.. Operation One difference between this jig and others that cut HB dovetails is that on this jig the joint must be cut in two passes, not one as is common with the "cookie-cutter" jigs; this of coarse will take more time. One visual difference in the joint produced is that with a �", 14 degree dovetail bit used, the tails are noticeably larger. To me this size is much more appealing than the miniscule (typically only �" deep) joints made by the more common and cheaper HB jigs. To me, 1/4" deep joints appear out of scale with the stock thicknesses commonly used for drawers. HB joints are pretty easy on the jig, the only precaution is to make sure the "fronts" are firmly clamped to prevent movement. By using spacers it is possible to cut HB overlay or HB inset drawer fronts, the manual shows how to set the jig for either type. Through dovetails (TD) are a little more involved but the Leigh is really good at cutting them. These joints require the use of two cutters. This jig is matched to a dovetail angle of eight degrees, all Leigh TD joints use this angle irregardless of cutter size. If one needs to cut a bunch of drawers for a project then it may be very beneficial to have a second router on hand. Otherwise the cutters will need to be swapped for each new layout; all TD jigs would have this same annoyance to some degree. There are some aspects of the jig that make it arduous to use. When elevated at a comfortable working height, it throws chips everywhere. If very many joints are cut the operator would be covered in chips; a deflector will help somewhat. I've purchased the Leigh dust collection fitting. This makes a HUGE difference on how clean the operation is. Using it should result in about a 90% reduction of chips (as long as the collection hose doesn't get clogged). The down side to the device is that it obscures the bit and it is one more attachment on the router. While it isn't actually necessary to see the bit cutting, I would prefer to see it. Another down side to the jig is that it takes some effort to wrestle the router around to cut all the pins and the router is a little "wobbly" out on the edge. It isn't the torque of the router that one is fighting with. It's the drag of the guide bushing, the drag of the base moving across the fingers, the pick-up hose if you are using it, and maybe the combined ancillary effects of the chips, noise, and the death grip I have on the router. Leigh Myths
My Methods When the joint size is over 12" OR six fingers wide, I usually set the jig for a Symmetrical layout. This saves quite a bit of setup time especially if only one router is used. Using whatever objects are at hand in the shop as spacer guides I make the finger width and spacings the same from each edge of the stock. Using this method I set the jig to cut a little on the "loose" side; unless I make a mistake I usually get within ~0.01" or less in matching the stock edges on assembly, close enough for me. On drawer size glue-ups I use regular yellow glue. I'll usually
clamp the parts together for 10 or 15 minutes then remove them from the clamps to check
for square. Unless there is a "problem joint" I do not leave the clamps on
because you can easily clamp perfect parts into an un-square assembly. I also set the
parts aside to cure on a FLAT surface, curing on an un-flat surface can induce warp. For
larger glue-ups I use white glue to allow for more assembly time.
Summary |
|
| This is a close-up view of one of the scales on the template. The scale is aligned to a line on both ends of the template to a desired setting. This scale allows something other jigs cannot do. That is, provide the ability to adjust the fit of the joint based upon the stock used. For example, if using softwood like pine the best setting may be in one place but for a hardwood like maple in another. Even using the same cutter in both these instances there is a noticeable difference in fit when this feature is used. | 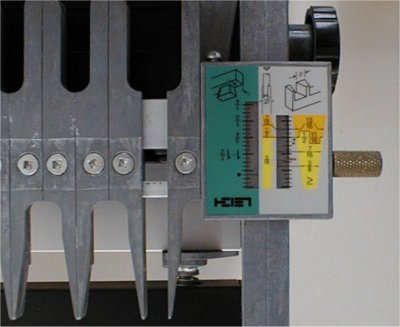 |
| Since the template can be used for either through or half-blind dovetails, the scale also is set up to make sense in which ever mode you should be in. In this case, the through dovetail setting is the legible scale so that is what the template is set to do. | |
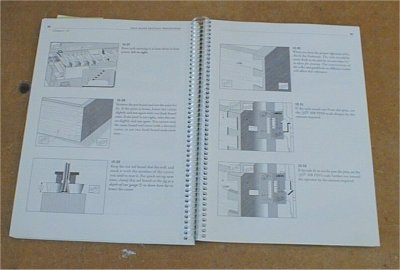 |
This is the manual provided with the jig. As stated
previously, this is the manual of all manuals. I have never seen anything better
than this. The manual is very thorough and well laid out. It is somewhat lengthy but so well done it doesn't matter. The pages shown here are representative of the entire thing. It follows a picture - paragraph format, everything is very clear. |
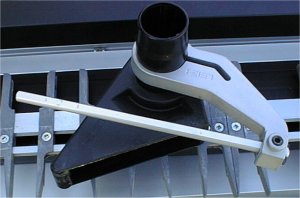
| This is a Leigh dust collection accessory, it does not come with
the jig. With this fitted it does obscure the cutter almost completely. It
does do a very good job at collecting the chips and should fit just about any router made. Before using this device, I would literally be covered in chips from using the machine. Using this collector makes the whole experience MUCH cleaner and more enjoyable. |
 |
| If you found this article of interest here are some others that
may be useful as well: Leigh
versus Akeda dovetail jig |
 |
 |
 |
 |
 |
 |
 |