|
|
|
 |
 |
 |
 |
 |
 |
 |
| What Is It The Router Raizer is a kit consisting of several parts, the design is such that these parts will allow the kit to be installed onto 19 different plunge routers. The design if fairly simple and straightforward, once I had it installed I wondered why some manufacturer had not included it into their basic router design years ago. Every year someone comes out with some heretofore unknown simple but clever gadget to be used for woodworking, the Router Raizer is just such a device. What Does It Do |
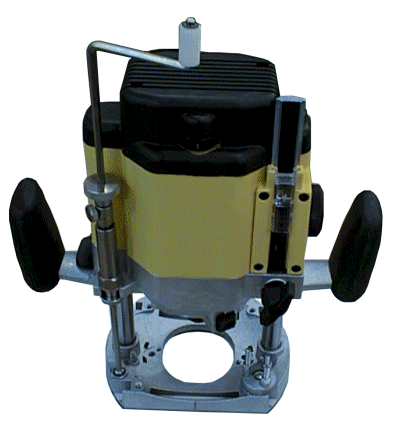 |
| How Does It Work The heart of the system is a threaded screw with a hexagon shaped hole running through it. By turning this screw thorough a fixed threaded shaft the router is raised and lowered. The kit is installed in two basic manners, the first is in a replacement of the external threaded rod used for height adjustment. The second is where the parts are installed inside one of the plunge rods. The particular model of router dictates which method is used. Unlike some accessories, with the Router Raizer installed the plunge operation (and locking device) still works. The only difference being that the router cannot be un-sprung fully unless the accessory is in its fully raised position. The reason for this is that in effect, the mechanism acts as a travelling "up-lock"; in any case this is a minor issue. |
|
| Installation In my particular installation, I did not encounter any problems, all the parts I needed were present, the instructions were clear and I had no occasion to call for assistance. The number of parts and size of the instructions could be intimidating to someone who is unfamiliar with this type of work. However, the instructions for a particular router are really only one page long with a separate template page for locating a hole in an insert for table use. As for parts, I had 18 left unused when I was done, the unused parts were for other routers. As long as the instructions are followed closely, the unit should go together easily; it took me about 45 minutes to install the device. Once the unit is installed, it's pretty plain to see how it all goes together and works, a second installation could be done much quicker. If I were installing this system again (on my particular router) I would make some very minor changes. I would omit the "rapid collar" (because of the way I use the router), I would get a nylon washer to install under the 3/16" steel washer, and I would place an o-ring on top of the lead screw to act as a bumper between in and the height knob. All these are very minor issues meaning I don't plan to disassemble the unit to make any of these changes. How Does It PerformQuite simply the devise controls the height of the bit just like it is supposed to. The resolution on the action is 1/16" of change in height per rotation. That resolution is adequate for any real operation that I can think of and not so fine as to be a nuisance when the bit needs to move a large distance. Using the base of my thumb I could twirl the crank handle very quickly to change the height of the bit when I wanted to move it fast. In use I could detect no backlash or precessing on the action, the bit moves in the same path as it did before the installation of the kit. SummaryThe more I use this accessory the more I like it. This is mainly because I currently have a gravity based router table setup and setting the height of the bit without having to try and overcome the plunge spring force and possibly pushing the insert up is a big convenience improvement for me. Previously I used an insert that I screwed to the table just to overcome this problem, even then it was not a total solution, this accessory IS a complete solution to adjusting the height of the router bit. The reason I was attracted to the accessory in the first place is because it seems like (mechanically speaking) that this method of height adjustment is inherently superior to the platform systems and much more convenient than "below the table" devices. I could of coarse get by without this device just fine but it does make one common shop task easier and more convenient. I think it is a good value when compared to other similar devices. AddendumAt one time I needed to use the router to which the Router Raizer is installed on another jig operated outside my router table. In it's place I installed another router in the table that was not equipped with this accessory. There were a few occasions where I needed to use the router table during this time and the utility of this accessory was made all the more apparent. Once you have used the Router Raizer in a router table, you'll never want to do without it!
In the interest of full disclosure Router Technologies provided this product to facilitate this review.
|
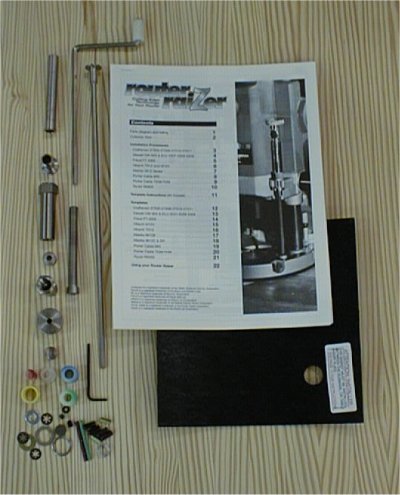
| Details The Router-Raizer is a kit consisting of the parts shown here. Not all of the parts are needed for a particular router installation. When I was done there were 18 parts left unused including the black rubber spacer shown here. |
 |
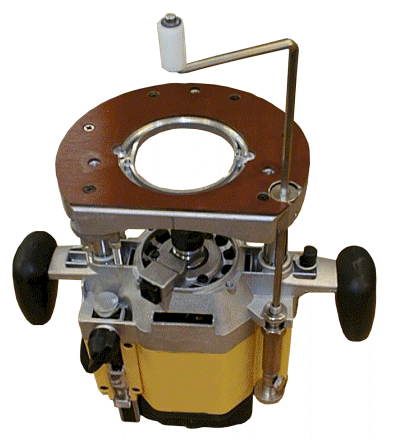 |
This view shows the router inverted as it would be in a typical router table. The crank handle can fit into the bottom of the accessory as well as the top. With a baseplate installed and a small hole drilled into it for access, the router can be very easily and precisely moved up or down conveniently. |
 |
 |
 |
 |
 |
 |
 |