|
|
|
 |
 |
 |
 |
 |
 |
 |
| Preface A friend of mine purchased a Rojek tablesaw and I helped him set the machine up. This gave me an opportunity to closely inspect the machine and take the pictures for this article. Throughout this article one will note several references to my own Hammer B3 tablesaw / shaper machine as well as a typical cabinet saw. This review is meant to present a general overview with enough detailed information such that any potential buyer will know more about this machine prior to this or any other Euro saw purchase. Impressions My first impressions of the machine are favorable. If one is looking at cabinet saws and sliding tables these machines are defiantly worthy of consideration. The quality and general fit and finish of the machine is generally comparable to a name-brand cabinet saw. There are no gleaming examples of Teutonic precision nor are there any irregularly formed bolts / un-deburred edges common of cheap Pacific rim imports. The saw came equipped with the CV2 sliding table, a 30" rip fence, and a scoring unit. The standard PK300v has the CV1 slider and a 50" fence. I advised my friend to get the CV2 instead because I considered it to be a better design. The primary difference between the CV1 and the CV2 is that the CV2 uses an outrigger which would provide more support when working with sheet goods. The CV1 slider would probably require a support table when cutting big pieces. The 30" fence was specified over the 50" because my friend already had a 50" Vega fence system he was fond of and I (correctly) theorized that the Rojek fence would be inferior to it. In our preliminary investigation, it appeared the Vega system (and probably other aftermarket rip fences) could be fitted to the Rojek fairly easily. The dealer was loath to sell the machine with a 30" fence but they were not fully aware of all this information. In my evaluation the primary high points of the machine are:
In my evaluation the primary low points of the machine are:
|
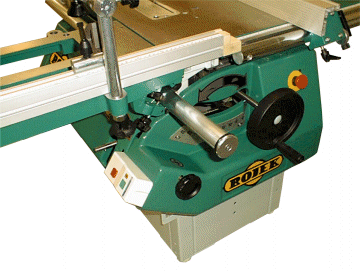 |
This view shows the front of the
saw cabinet where all the controls are. The main on / off switch is on the lower
left, the switch gear is magnetically controlled. An additional stop switch is
provided to the right of the blade raise crank. The blade raise crank is made of plastic but is as durable as any metal wheel. The crank wheel is not permanently attached, that is because only one crank wheel is provided. To tilt the blade one must remove the wheel (it pulls right off) and put in onto the blade tilt shaft seen just above the on/off switch box. This is a quick, no-tool operation. |
| While this may seem like an inconvenience one does
not really want a tilt wheel that could be accidentally nudged (as this one could be) when
operating the slider (walking through with the cut). The blade lock is the small
round wheel to the right of the on/off switch. The green parts that comprise the shroud on the left as well in this control area is made of some form of heavy plastic, it appears to be durable. The rest of the cabinet is built out of heavy gauge welded steel. |
|
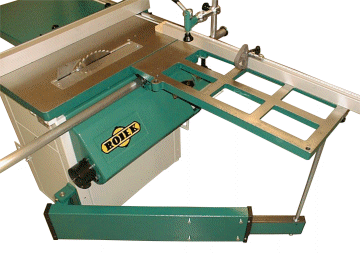
| This view shows the CV2 sliding table to good
advantage. This is not the normal table that comes with this particular model of saw. The
CV1 table has similar stroke capacity but the table itself is smaller and it does not use
an outrigger as this one does. With the crosscut fence in the "fore"
position the stroke capacity is around 22", set in the "aft" position it is
around 52". The cast iron table has miter degree markings embossed into the table for the crosscut fence. The table was bowed downward, I'll guess between 0.01" to 0.005". Not desirable but probably not significant enough to cause a problem either. |
 |
| The crosscut fence is held onto the table by two
captured bolts in the bottom of the fence. These bolts fit into two bushings inserted into
the table from the bottom and plastic nuts under the table secure the whole thing. With
the fence removed there are five loose parts to contend with. When a test crosscut was made the fence appeared to be set right on at 90
degrees. This is good because (unless I missed something!) there is NO way to cal the
fence to 90 degrees! The fence can be set in either the "fore" or "aft
"positions however when set at any angle other than 90 degrees, the outboard clamp
nut cannot be used (very effectively anyway). With only one bolt securing the fence this
would make the fence susceptible to being thrown off-angle. Additionally, when removed (or
re-set at an angle) the fence will loose its stop block measurement calibration. |
|
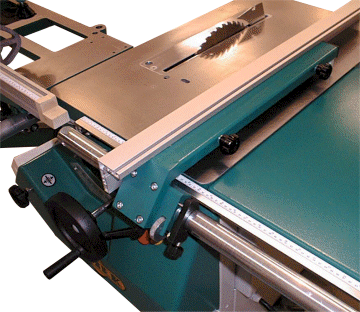 |
The rip fence is less than inspiring but seems
to be typical of those found on Euro machines. The fence section can be slid anywhere along the "head" to act as a stop or removed and rotated to present a low height section to the blade. This would also allow it to rip laminated pieces (not laminate material itself though). The face presented to the blade isn't flat, it has a small wave profile; this works just fine, it's just a little different. The fence measured straight. The fence can be lifted off anywhere along the rail. It also includes a micro-adjust feature very similar to the Vega fence system. |
| The "head" of the fence is a heavy welded
steel section but it is not very wide overall. Based upon a quick inspection it
seemed plenty rigid, probably about as rigid as a Unifence or home shop Biesemeyer system.
Typical of many Euro fences, this one is locked down using a simple lever bolt.
This isn't as nice as a cam lock; further, without a little effort on the owners
part the fence would be prone to developing "memory" due to the lock-down bolt
design. The rip fence guide rail is a solid round bar, the measuring scale is attached to a small angle section and can be adjusted independent of the fence. To set the fence one must sight down the face of the fence to the scale; it is edge-aligned, there is no cursor. This isn't difficult but the fence face has this wave profile, it seems like this would make it prone to inducing an off-axis error. Overall the fence system is usable, certainly an order of magnitude better than the fence that shipped with my more expensive Hammer B3. However, this system is still not in the same league as any of the popular American style fence systems on the market; a Unifence (for example) is twice as good. |
|
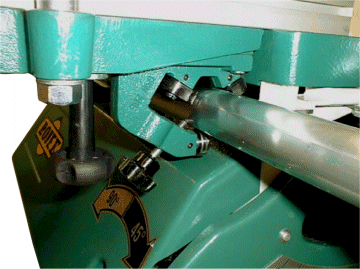
| The sliding table rides the guide bar on six
ball bearings. They are all mounted on cams which makes part of the system fairly
easy to adjust. The top two bearings in a set have little plastic fenders which act
as sweepers to keep the sliding action working well. The design of this bearing system allows the owner to control very precisely the amount of force required to move the slider. Both the CV1 and this CV2 model sliders have a very controlled and precise feel to their movement. This view also gives a good indication of the knob congestion in this area. |
 |
| On this machine the table was at a slope relative to
the table measured at about 0.004" across the length of the main iron table.
The only way to "adjust" this aspect is to use shims, in effect this isn't
adjustment it's assembly. The deviation (0.004") is fairly small and pretty
good giving the fact there isn't a built in way of compensating for it; we left this
as is. In this view can also be seen the table lock, it's the bolt protruding though one of the bearing mount arms. This type of lock would allow a user to secure the table at any point along it's stroke (useful for loading the table when the machine is on). Somewhat to the right is the pivot point bolt that hold the crosscut fence in position. The large nut seen here secures the stock clamp to the table. The nut doesn't have to be installed tight and the clamp is easy to remove / replace. A good manual should provide all the information needed to assemble, align, and maintain a machine such as this. The one supplied is only 24 pages, of somewhat low type quality, and not as helpful in the areas of alignment and assembly as it really needs to be. Compared to my Hammer B3 manual the Rojek document is not as pretty however it is just a little more useful. |
|
 |
The table surfaces are not ground like a typical cabinet saw, they have a milled surface. The Rojek was milled just a little smoother than my B3 but it really isn't an issue; it does not affect machine performance. In any regard, all the cast iron surfaces were sanded as part of my standard machine prep process, it became plenty shiny and smooth afterwards. Except for about four square inches in a corner which was 0.003" low, the table was flat. |
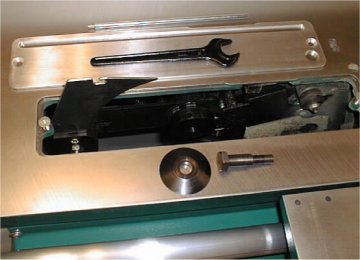
| The arbor is a standard 5/8" diameter however
it is not a familiar left handed acme shaft (I originally thought it would be), it's a
bolt! This works fine but it does take more time to change a blade than on a typical
cabinet saw or the 30mm bore on my Hammer B3. The saw will accept up to a 300mm or
12" blade. Unlike many Euro machines, this saw will also accept a dado blade
(full width) or molding head. The saw is equipped with a 3hp+ motor. The blade speed is higher than typical 10" saws, I'm not absolutely sure what the actual rpm is. In the tests cuts we performed the machine seemed to have plenty of power. The arbor and flange runout was basically zero under static conditions. With a 12" blade fitted there was some discernable blade runout or "flutter", the riving knife would also vibrate noticeably. When a blade damper was installed later the flutter went away, the vibration of the riving was also noticeably reduced; there was no such flutter evident with a 10" blade. (ref: I had to change the pulley and belt of my own B3 due to 12" blade instability, the Rojek "flutter" mentioned was substantially less detrimental than the instability I had on my B3). With a 12" blade fitted the saw is loud; it doesn't seem nearly as loud as my Hammer though. The saw starts up immediately upon pressing the start button; there is no "bang" commonly associated with cabinet saws. Each blade is driven by its own poly-vee belt, this a better transmission system compared to the cheap Vee belts found in cabinet saws. The saw also has some form of mechanical blade brake. When the stop switch it hit, the blade stops very quickly, Three seconds or less with a 12" blade, this is a significant safety feature in my opinion since it reduces the temptation to reach near the spinning blade to remove off-cuts. The throat plate is a uniform thickness piece of aluminum. A dado plate is also included with the machine (not shown). The insert fit perfectly in its spot and was dead level with the table, it has two screws to hold it in very securely in place. Zero clearance inserts would have to be made by the owner; there is nothing about the design that would make this hard to do. The throat opening in the table provides a lot of room to work in and it is needed because of the bolt-arbor. Blade change wrenches are included along with a special rod that goes into the arbors to hold them in place while the wrench is turned. The scoring blade is a typical two-piece unit which uses shims to set the kerf width. The scoring blade can be raised lowered independently of the main blade. It is raised in typical fashion via an Allen screw accessed via a hole in the table. An elongated hole nearby controls the lock and alignment aspects. The scoring blade cannot be left on the machine with a 12" blade fitted, it can be with a 10" blade though. Typical of Euro machines is the riving knife which rides up and down in conjunction with the blade. This riving knife is very similar to the one on my B3. It doesn't allow for any adjustment relative to blade parallelism AND it didn't line up all that well. These issues can be overcome and the riving knife is far superior to the splitters found on American saws, I recommend that it be used. The blade guard (not shown) is a LARGE opaque plastic housing that attaches to the riving knife. We didn't try it with the machine on, it is equipped with a DC port. One aspect of the guard that was fairly obvious that it would NOT always ride up on a cut, it would be shoved towards the blade. By comparison the Hammer guard is clear, smaller, rides up correctly, and is a little easier to attach / detach. |
|
| Recommendation The Rojek saw in some ways represents what users are trying to achieve by adding accessories to cabinet saws. If one is seriously considering this machine, I recommend that it be purchased without a rip fence if possible. An owner will most likely be happier with any of the popular aftermarket fence systems. It shouldn't take too much engineering to put one of them on this machine. I also recommend the CV2 slider over the CV1. Assuming the outrigger problem (mentioned) is not any unrecoverable design flaw I think it is a better choice. I also recommend planning on doing some form of modification to the crosscut fence system to improve upon its operation. The attraction this machine
has is that it is price competitive when compared to a good cabinet saw with an add-on
sliding table and that it includes many beneficial European features. It is also one
of the most American-like Euro machines available.
I would also like to thank my friend Nate Schenkel for providing me the opportunity to inspect his machine for this review. |