|
|
|
 |
 |
 |
 |
 |
 |
 |
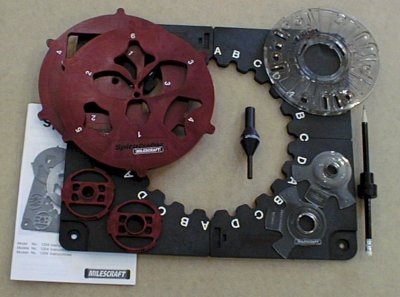
| Description The Milescraft Model 1204 Spirocrafter is a rather unique template for creating "Rose" like patterns for woodworking. The device is primarily intended to be used with a router and would be used for either surface relief cuts, pierced or cut-out work, or a combination of the two. The kit comes with a template holder that must be snapped together, two pattern templates, two guide bushings for "normal" routers, a "normal" router sub-base adapter, a centering cone, two guide bushings for a Milescraft Dremel base, a pattern tracing tool and two instruction books. Of these items, most users will only need the pattern holder, the templates, and instructions, the other items will not be required. |
 |
| The Milescraft router sub-base is required to use
the matching guide bushings. The base did not happen to fit any of the routers I had
but the guide bushing diameter is not absolutely critical and I was able to use the OEM
bushings with the routers what I have. The concept behind the Spirocrafter is actually quite simple, it is nothing more than a pattern you follow with a cutting tool. The template is rotated for each cut until the desired pattern has been cut. The template can be rotated in any of 24 different positions in the template holder. The templates themselves have a total of 10 separate outlines than can be used in whole or in part and by either following the edge or by cutting the the entire field. Combine this with different bits and guide bushing diameters and the number of distinct patterns that can be made is fairly large. The patterns themselves run about 3 to 7 inches or so in diameter. This sounds small but it actually appears to be about the right proportion quite often. There are times when a larger pattern would be desired, maybe 50% larger. |
|
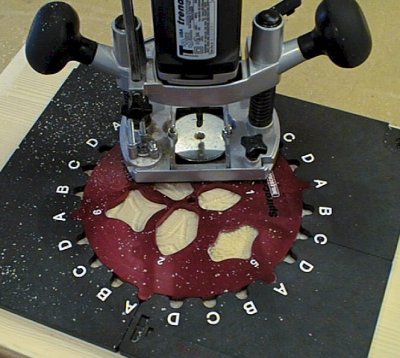 |
In Use The Spirocrafter is pretty easy to use. One simply aligns the template holder to the stock and starts routing away. It is probably apparent that the template holder is of a good size and may even be larger than the work piece. On large flat stock, attaching the template holder is not an issue, on small items it can be and one might need to get creative in order to come up with some method of securing both the stock and the template holder in place. Once the template holder is in place, the rest is pretty easy. The instructions give the numbered pattern(s) to use as well as the rotation increment for many patterns. There are many basic patterns that can be created however and the instructions do not cover them all. That, in part, is what the pattern tracing tool is for, so you can play around and experiment with idea before actually cutting any wood.
|
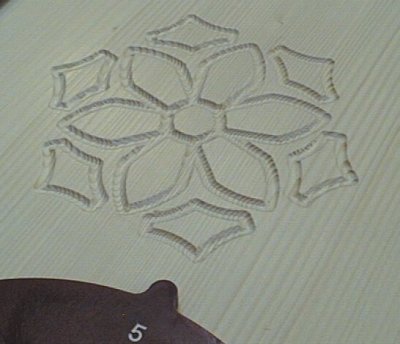
| One minor annoyance of the device is that I found that I had to pry the pattern out of the holder for each rotation. The pattern below was cut in about 10 minutes. This particular one involved 12 rotations in total and used only 2 patterns on the template. It was cut with a 1/4" diameter round nose bit less than 1/8" deep. Another 5 minutes or so of sanding plus 5 minutes of setup makes for around 20 minutes per pattern. This is a significant amount of time if one were doing a lot of this, there are however ways of significantly reducing this time in a production situation. For a pattern or two, it really should not be an issue. |
| Tips This is by no means a comprehensive list of tips, they are just a few common ones that can be used for any type of surface embellishment similar to this:
|
 |
|
|
| Summary The Spirocrafter is a very interesting embellishment device. It is somewhat tedious to operate but that is basically inherent in the process, the only way to get around this is to use a CNC router which is of coarse more expensive than the Spirocrafter. The only real catch in the design is trying to hold small part and the template in place, that really is the only drawback. The range of possibilities with the Spirocrafter is quite extensive, all with the same basic patterns supplied. Is is very easy for example to alter the same pattern just by using a different bit, by using different cutter depths on different pattern sections, by following the outline or removing the entire field within the pattern. Considering the possibilities and the cost of the tool, the Spirocrafter is a very good value. |
In the interest of full disclosure Milescraft provided this product to facilitate this review.
|
 |
 |
 |
 |
 |
 |
 |