Description
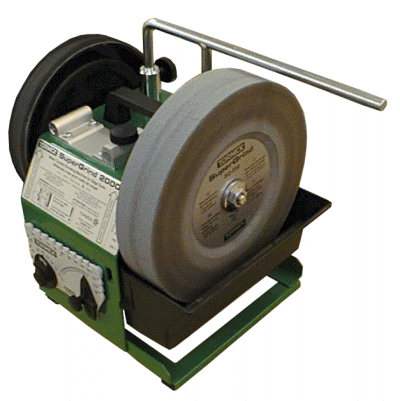
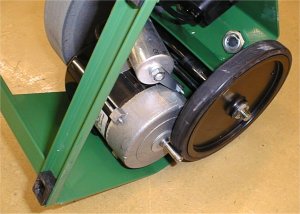
The machine is basically a sturdy open frame with a continuous duty motor slung
underneath. The motor shaft turns a large rubber wheel on one end which in turn drives a
chrome / nickel plated shaft held by nylon bearings. The large diameter grinding wheel and
leather faced honing wheel are attached on opposing ends of this shaft.
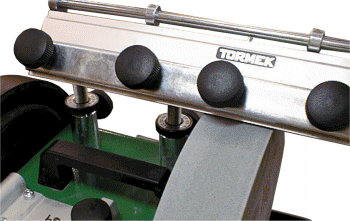
A rod known as the Universal Support is attached in the center of the machine and this
provides the support for the multitude of jigs available to the system. The basic machine
comes with a straight jig that can be used to hold plane irons, straight chisels, and
other similar tools.
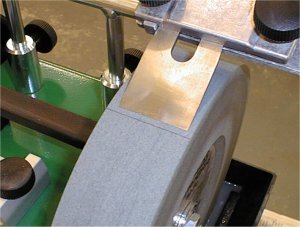
The normal sharpening position is for the tool edge to be presented to the grinding wheel
such that the wheel is rotating towards the edge. There are times when one may desire or
it is required for the wheel to rotate away from the edge. In these cases the Universal
Support can be moved to the front of the machine. The honing wheel would always be used so
that it is rotating away from the tool edge. Although there are several jigs available for
use with the Tormek, it is possible to sharpen quite a few of the types of woodworking
tools you are likely to have with just the straight jig. It is also possible to use the
support as an aide in some freehand sharpening.
The wheel is specially made for Tormek and it is possible for it to be "set" for
one of two grits, 220 and 1000; this is accomplished with a "stone grader". By
holding one side or the other of the grader against the wheel will make the wheel coarse
or fine. Although it is an optional accessory, I think the grader is really required to
get the basic performance from the machine, it is certainly less of a machine without it.
The Tormek also comes with a very useful video that briefly explains how to use the
machine and the optional accessories as well. The manual is a small hard-bound book which
goes in great detail about sharpening in general and using the machine and all the
accessories. Both the video and manual are far above average in quality and usefulness.
The manual along with a lot of other useful information is available on the Tormek
web site as well.Using the Tormek
The system really excels at establishing and
maintaining consistent angles. The grind angle is controlled by the amount of
projection from the holding jig and its height above the wheel. The height is controlled
by how far the universal support projects into the machine base. Both of these aspects are
very easy to control, the support height is the feature that is used for adjustment most
often. Because there is very little material removed from the wheel, this system works
quite well for holding a grind angle. If all you want to do is match an existing angle,
one can simply sight the grind angle by eye. If you want to set a specific angle a little
more effort is required. Supplied with the jig is an angle tool; using this tool while
setting the height of the rod one is able to dial in whatever grind angle is desired. It
does take a little effort to accomplish all this, a third hand would be helpful in holding
the angle tool, the universal support, and to turn its locking knobs.
It is not absolutely required that the wheel be true except for certain types of
sharpening. Mine was out of true on the horizontal surface by about 0.010", the wheel
was out of true vertically by about the same amount. I did sharpen a couple of tools when
the wheel was in this condition but since I had the truing tool I did use it before doing
much more. My assessment is that the system is useable without the truing tool but that a
true wheel is MOST desirable.
With the proper angle is set, the wheel graded as desired, and the water reservoir is
filled, one can begin; sharpening a tool could hardly be any easier. You simply slide the
tool across the wheel until you feel a burr or "wire edge" on the tip of the
tool all the way across. Once this is done, you may re-grade the stone to the fine grit if
you wish and grind for a little more, the size of the burr will probably be reduced but
should still be there. After this, inspect the surface to make sure there are no
irregularities.
To hone the edge you use the leather honing wheel. A special paste that comes with the
machine is applied to the wheel and this is what really makes the steel shine. To do that
you carefully apply the edge to the wheel, a few seconds for each side until the burr goes
away. If properly done you will now have an extremely sharp edge.
You can also use the sides of the wheel, this is most useful for flattening edges prior to
sharpening. I've used the side successfully to flatten small chisels and even the sole of
a rabbet plane. I think I get a better surface using sandpaper for medium to large chisels
as well as plane irons and soles. Some tools actually require a face-grind to sharpen
them, depending upon the specific tool, the flat side of the wheel may work for this.
Performance
If you are anything like me, once you discover how easy it is to sharpen tools using the
Tormek, you'll want to use it to sharpen everything you can get your hands on. This will
undoubtedly get you well acquainted with the performance of the system in fairly short
order. Starting with a trued stone will undoubtedly make everything better, the wheel
tends to stay true especially if you sharpen long edges like jointer knives every so
often.
If you need to remove a lot of material it will take considerable time to establish a
proper angle using the Tormek. The system really excels at establishing proper and
consistent angles on your tools. Being able to switch from 220 grit to 1000 while
maintaining the proper angle along with the ability to inspect the ground edge at any time
eliminates a faceted edge you may have found yourself making previously.
It only takes a couple of minutes to touch up an edge. It takes longer to correct improper
grind angles; for instance, it takes me about 6 minutes to do a chisel, about 11 to do a
plane iron or jointer knife. It took 45 minutes to do three 13" planer knives but I
decreased the grind angle in that particular case. These times would not take into account
any prep of the back of the iron if you needed to do that.
Wear of the stone is hard to estimate. When you first get the machine you'll probably true
the wheel and sharpen all your tools. This will of course wear the stone quite a bit at
first. I wore the stone by 5.4mm (dia) in the first month of use sharpening the equivalent
of about 70 chisels. A replacement stone is about $130. The leather honing wheel
should last a long time, a replacement is $50 should it be required.
The Accessories
In addition to the straight jig, there are several optional ones available for sharpening
scissors, cutlery, gouges, lathe scrapers, lathe insert cutters, small chisels, jointer
knives as well a small profile honing wheel and a couple other jigs. The jigs are made of
die cast metal parts with some machining. I have never had any problem when putting a tool
into any jig. As long as it is set right, it will grind a correct edge either straight or
equally curved on both sides as required by the specific jig/tool combination. I'll admit
that I never did get the hang of the scissors jig though.
My favorite jig is the jointer knife jig. This jig will accept blades up to 13" long
but supposedly longer blades can be done in sections by shifting them. I was particularly
interested to see just how well this jig would work compared to the a horizontal grinder I
normally use. In essence, it works a lot better and it is much faster. This jig is the gem
of the entire lot. This jig has the potential to be used for other sharpening tasks as
well.
Tips
I don't have many tips to pass along that aren't already in the instruction book but here
are a few:
- I put a light coat of oil or dry lube on the universal support
rod, this makes the jigs slide back and forth a little smoother.
- It is possible to "twist" an edge when you place a small
chisel in the straight jig. This will create an angled grind instead of a straight one.
You can check for this before any real grinding is done and it is easily corrected by
adjusting both knobs. You need to ensure that the plates are parallel (assuming that the
chisel is uniform in thickness).
- The Tormek is a bit messier than one might think. To control the
spread of water, I place the unit on a large inverted lid from a cheap plastic storage
container; this keeps the water off the bench and makes cleanup easier.
- You may discover that some of your (now very sharp) tools are more
easily nicked, if so, consider decreasing the sharpening angle.
Summary
The beauty of the Tormek system lies in its design as an integrated system. With it you
will be able to grind a proper angle on nearly any tool you have and do it with repeatable
precision. The icing on the cake is that it is so easy to get this level of performance.
The Tormek is expensive but it is the most complete "out of the box" system I
have ever used. |