|
|
|
 |
 |
 |
 |
 |
 |
 |
| Description The Trend MT jig is used to cut both the mortise and tenon (M&T) for this standard woodworking joint; it cuts a rounded mortise and either a rounded or square tenon. The jig consists of the base to which the tilting back plate is attached and the top plate which is moveable and holds the guide limit stops (which is basically the template). The unit also includes a set of 4 clamps and several different sizes of PC style router guide bushings. The Trend MT Jig is really not unlike a jig you might construct in your own shop. The difference is that this jig is constructed of durable steel and much more compact than what you would end up with using common wood products. It is designed to be screwed to a sturdy surface like a bench. I screwed mine to a thick board so it could be clamped to the bench. |
 |
| Without shifting the stock, a joint about 4" long can be made in any tenon thickness between 3/16" to 9/16" in 1/16" increments. The tenon length is determined by the bit length, using Trend bits this would be about 1". When clamped to a workbench, the maximum stock length (for tenons) would be around 38 inches or so. This ought to accommodate most of the stock in need of a tenon, if not, the jig could be elevated. As set of PC compatible brass guide bushings is included with the jig. | |
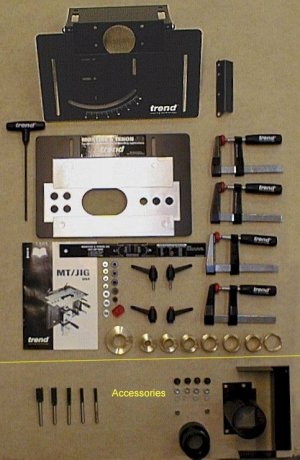 |
Assembly The manual is a little thin at 23 pages but pretty clear. It describes how to assemble and setup the jig and how to cut basic M&T joints. There isn't too much assembly involved, basically the top plate is mounted to the jig and clamps are installed onto the tilting back plate. The four clamps are small bar type units that fit into slots in the jig. They are held captive to the tilting back plate by small washer head screws. There is no assembly involving the router, guide bushings are the only router interface. There are two steel plates the router rides upon and two moveable plates that actually form the stops or template part of the jig. These parts seemed to be a little rough on my unit but with a very brief sanding with 320 grit paper and a wax job they smoothed right up. I also have the dust collection accessory fitted and this required some minor assembly to the jig. The dust collection works remarkably well when the tenon hood is fitted; without it you'll get covered in those long-thin (itchy) slivers of chips; I highly recommend this accessory. |
| In Use
The Trend jig works by guiding a router in a pattern to form the M&T joint, the jig has to be setup for the joint size and position first though. The jig uses a small tool called the "setup bar" to align it to the stock. For joint spacing from the reference edge the top plate is moved in our out and then locked down. The plate can move at an angle so care must be taken to ensure it is positioned straight with the reference mark on the stock. Using the bit diameter reference marks on the setup bar, the long and short template halves are positioned relative to marks on the stock and the templates are clamped down tight. |
 |
| After the jig has been setup it will not need to be
re-set unless the joint size changes. The setup bar will be used however to position all
the stock onto the jig. The same jig settings are used for both the mortise and tenon. Four small clamps are provided with the jig and they fit into various slots in the tilting back plate. They can be a little awkward to use but they work and truth be told this (clamping) is a bit of a challenge for a many jigs. Depending upon the size of the stock, the vertical guide piece may need to be removed from the tilting back plate when making mortises. This is attached with three screws so it takes some time to remove and re-install. |
|
| Mortise: To cut the mortise, the appropriate bit and guide bushing is installed. For all size of mortises the same guide bushing is used. This bushing is the same width as the template so the router is effectively constrained to moving in a straight line. The manual recommends routing the mortise in 3/16" steps. I found that with the 1/4" shank Trend bits chatter could be a problem if too deep of a step is routed at one time; the mortise would end up being at a angle from the reference. When I switched to using 1/2" shank spiral bits and another technique, chatter and induced angles was not an issue, it was also faster than cutting in 3/16" steps. |
 |
Tenons: When cutting tenons the bit and guide bushing needs to be changed from the mortise setup. For all tenon cuts the 5/8" diameter bit is used and an appropriate guide bushing. The manual has an easy to understand chart that lists the proper guide bushing to match the mortise bit that was used. The joint is made by guiding the router along the interior edge of the template. Since the guide bushing is much smaller than the template opening, it is possible to intrude into the tenon area. Although it is possible to make this mistake I haven't found this particular issue to be a problem. |
| Because the movement is restricted you cannot make a light skim cut all around the stock first. When cutting the tenon, the bit is plunged in small steps (3/16") and a climb cut is made. If a full plunge cut were made there may be some tear out and a torque divot from the initial plunge. Although it takes extra time, the Trend technique creates the best joint profile with this jig. Due of the use of guide bushings I was expecting some concentricity issues to arise but I don't think I observed any. | |
| Other Joints The 5/8" diameter tenon bit will limit the opportunities for double tenons and the like. The manual illustrates all sorts of angled joinery though such as one might need for chairs and other joint challenging projects. If desired, the template halves can be turned around and square tenons can be cut. This still leaves a rounded mortise but this could be squared off with a chisel. In addition to M&T joints, the Trend is also capable of making dowel joints, in fact it is quite good at this. For these the round holes in the templates are used and they are set in patterns that would allow a closely spaced multiple joint if desired. Using a router as opposed to a drill creates a much more uniform dowel hole. |
| Summary The Trend jig is primarily suited for small work but it will cut a wide range of M&T joint sizes and dowel patterns. For M&T work it requires changing two guide bushings and two bits; for this reason a two router setup would be more productive. Using �" shank spiral bits will also speed up production but on the whole using this jig will be faster than using a dedicated mortiser and tenon jig for the tablesaw. At $300 the Trend MT jig isn't cheap but neither are a dedicated mortiser, a tablesaw tenon jig, and a dowel jig. A good router jig should do two things, secure the stock and accurately guide the router. The Trend does this; it is easy to use and has a short learning curve. |
In the interest of full disclosure Trend provided this product to facilitate this review.
|
 |
 |
 |
 |
 |
 |
 |