|
|
|
Incra Crosscut Fence for the Hammer B3 / K3
 |
 |
 |
 |
 |
 |
 |
Return to the Hammer B3 Index Page
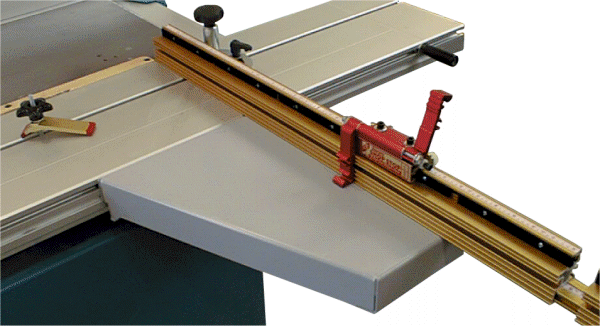
Genesis As any careful reader of this site would know, when one orders a Hammer B3 outfitted with an outrigger, the factory takes away the miter fence from the package (without notice BTW); it sounds like a "bait and switch" sort of tactic. Just because one chooses to spend the considerable sum for an upgraded feature doesn't mean that another unrelated feature should be removed! This article shows how an Incra crosscut fence can be easily installed on a Hammer using stock components and a little Yankee ingenuity. |
 |
In order to attach the fence to the
stock Hammer miter bracket it is necessary to either drill new attachment holes or
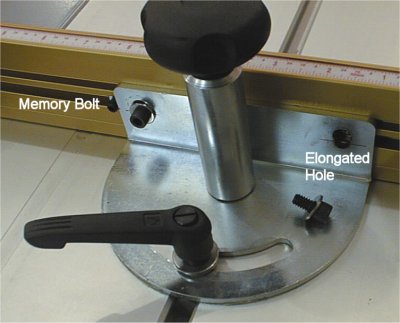
elongate the ones that are already there. This view shows the fence attached via elongated holes. The holes needed to be moved down about 1/4". I did this in about 10 minutes total with a rat-tail file. The original Incra hardware can be used to attach the fence to the bracket. It isn't apparent in this view but the large clamping knob will interfere with the Incra Flip Stop in settings any closer than about 4". The white stop clamp knobs hit the post. |
| Also note in this view the "memory bolt". This is simply a 1/4-20 nut in the appropriate slot in the back of the fence with a long setscrew locking it in place. The body of the setscrew abuts the miter gauge bracket. This allows the fence to be removed or adjusted left and then reset without having to recalibrate the tape measure on the fence. | |
| Some method needs to be used to
provide for a 90 degree calibration just like with the stock Hammer fence. The stock
calibration parts could be used if the auxiliary table is not used. This view shows an alternate method that uses the auxiliary table itself as the calibration point. This also provides more alignment resolution than the Hammer system since it is much further away from the pivot point. |
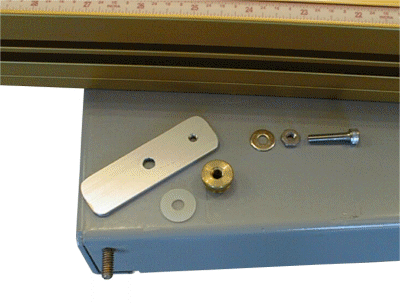 |
| The parts required to make a 90 degree calibration point are simple, they consist of a 1/4-20 bolt threaded in from the inside of the table. A 1/4-20 thumb nut with washer. A 10-32 Allen bolt and cinch nut. And a flat piece of 1/8" thick aluminum with 1/4" and 10-32 threaded holes. | |
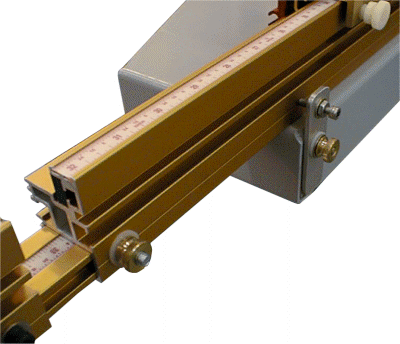 |
This view shows the calibration
hardware installed and in use for the 90 degree setting. Also note that the fence
extension lock bolt has been replaced with a hex-head 1/4-20 bolt and brass thumb nut for
added convenience. To calibrate, the hardware is swung up as shown and the #10 bolt is advanced or retracted to push against the back of the fence to achieve the perfect 90 degree setting. If some other angle is desired or the fence needs to be removed the thumb nut is loosened and the bracket swings down where it will not protrude above the table. |
| So what do you do if you don't have
any Hammer hardware to use because you ordered the outrigger and they removed the miter
fence from the package! You can still install a fence like the Incra onto your
machine. There are a few ways to do this of coarse and it will require a little more work than what I've shown above. This picture shows an attachment method similar to that used to attach the Hammer crosscut fence to the outrigger. |
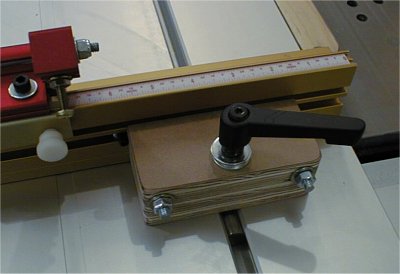 |
| This installation uses a thick wooden block that accepts two long 1/4-20 hex head bolts that attach to the fence via the T-slot originally provided for this. There is also a rod riding in the T-slot of the sliding table with a threaded hole to accept a clamping bolt and levered nut. This rod is critical to the design. The levered nut is installed far enough away from the fence so that it will not interfere with the clamp knobs on the flip stop. This method still does not have any scale for setting the angle. | |
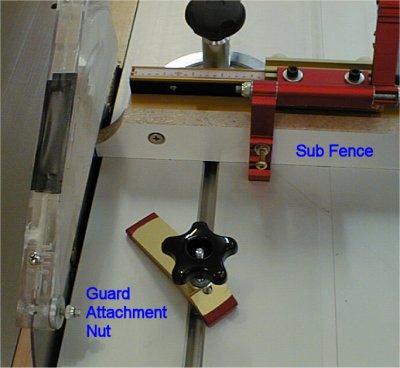 |
One of the nice features of the
Incra fence and stop is that it can easily accept a sub fence. Incra provides
hardware for this with their miter gauges. As any Euro saw owner finds out sooner or later, the guard and especially its attachment nut pose a small problem for crosscut fences. Some machines have notches cut in the fence itself, others use wooden blocks in the end to solve this issue. |
| What I show here is some 3/4" Melamine used as the sub fence, the end of the Incra fence is held away from the blade by about an inch. The stop has been adjusted to accommodate the sub fence which has been profiled to avoid the guard. Melamine is a good choice for sub fence material since it is very consistent in thickness and it's cheap. A sub fence also helps prevents tearout by supporting the stock right up to the blade. | |
| Conclusion This installation shown in this article although easy is still not perfect, mainly because it is using stock Hammer hardware. The system lacks for instance any on-board angle reference. This is because of the POOR design of the Hammer angle scale which relies upon the fence thickness to provide an accurate reading. If their engineers had made the scale read off of the back of the fence (where you could see it) the angle scale would have worked. The performance and utility of this Incra crosscut fence retrofit is remarkably better than the original supplied by Hammer. The uninspiring nature of the original Hammer system is all the more unsatisfactory considering the price of these machines. As I've shown, it would obviously NOT have been too much effort for Hammer to have included something of Incra class quality and precision with such an expensive machine. |
Return to the Hammer B3 Index Page
 |
 |
 |
 |
 |
 |
 |