|
|
|
 |
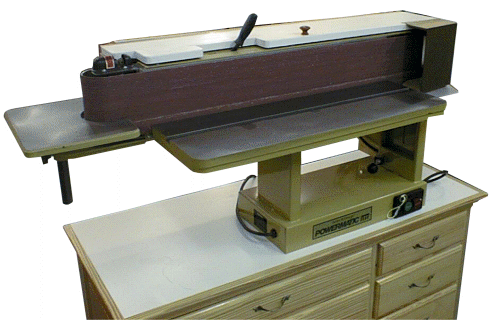
| My horizontal sander is a unit imported by Powermatic; it is very similar (if not identical to) many other units imported by others. The reason I bought this brand over others is that it was the only model that advertised a cast iron platen. While evaluating different machines, I also considered building a home-made version based upon the ShopNotes plans. One reason I seriously considered doing this was due to some text in the ShopNotes article regarding a horizontal sander they used. The primary complaint ShopNotes had on their purchased unit was that it would not track properly. In the end, I decided to buy a unit instead of building one based upon the fact that a thick metal platen would be better than the one shown in the ShopNotes design. The ShopNotes unit also did not tilt, and I didn’t want to spend a lot of time designing - building then redesigning - rebuilding one. Impressions When I first powered up the unit, it did have some problems tracking but after less than an hour of run time it settled in and it tracks just fine. The only time I ever adjust the tracking is when I spin up a brand new belt and even then any adjustment is very minor. The tilt function works but is rather crude, there is no way to dial in an angle. The tilt angle clamp works and there are stops for the 90 degree angle. The problem in setting any angle is that when the iron table is moved up or down, the platen angle may no longer be true. There is enough slop in the table mechanism to throw any existing angle setting off. I’ve rarely used the angle function; in effect, for me it didn’t turn out to be that useful of a feature. The main table has a miter gauge slot and the machine comes with a miter gauge. The machine also comes with a 90 degree sanding jig that uses this slot. The main table is adjusted via two hand screws located underneath it. In theory the main table can be adjusted for bias (angled with respect to belt travel) however the adjustment is small and causes other problems when used; the table can also be adjusted in height. The radius sanding end of the machine has its own table which has no true adjustment features to make it’s surface co-planar with the main table. The dust shield is a simple sheet metal affair that works a little better than nothing at all. When using the machine for radius work the dust collection is basically zero. It isn’t required for machine operation but when in use the machine can produce clouds of sanding dust therefore like any big sander dust collection is highly desirable; a 4" duct and 650cfm collector is probably the minimum dust collection system for this machine; a shop vac or even a smaller diameter hose is not adequate. The motor direct drives the belt and is sufficiently powerful for most tasks. However, it is possible to bog the motor down when using a low grit number belt or if the operator is very aggressive when removing material. The switch gear used to control the machine is not too exceptional, they are direct wired switches but the snap action is not as good as other machines in my shop. One effect of this is that when the OFF button is depressed lightly, the machine may not turn off. The machine comes with a stand that must be assembled. The sander is set upon the stand and bolted in place. The sander is fairly heavy and it would be best if help is available to lift it onto the stand. There are no castors with the stand and the machine vibrates a little when used. Modifications The first order of business was to install a mobile base on the stand so I could move it around; this was a temporary measure. The next modification was to build a replacement for the stand. It is my practice to build roll-around drawer cabinets for machine bases whenever possible. Most stands that come with machines do not enclose any machine hardware and are basically as waste of space. To that end I built a six-drawer cabinet that the sander would sit upon just like the previous stand. This new cabinet is about twice as large as the original stand to take advantage of the entire machine footprint. For mobility, the cabinet has wheels and castors integrated into it. The rear wheels are 8" rubber tires with roller bearings that are mounted to a rigid axle. The castors are 4" rubber tires. The large diameter wheels make this machine the easiest to move of all I own. The temporary stand I made used an in-line toggle clamp to keep the machine from creeping away when in use. I had planned on using the same method on this stand but it was not needed. The machine does not creep away even when bearing down on the machine when in use. Another benefit of the cabinet was that the machine vibration diminished greatly. The second modification deals with dust collection. I built a replacement for the sheet metal dust shroud. The new shroud includes a flip-top to more fully enclose the belt and still allow for convenient belt changes. Near the DC port I’ve installed a contoured block inside the shroud. This block creates a high-pressure zone that impedes the air-flow created by the belt; this prevents nearly any dust from continuing to follow the path of the belt to the back side of the machine. Without this device, the dust collection is noticeably degraded. A brush could probably be used in place of the block, it may even work better. The new shroud also includes a flip-down funnel; this funnel is down normally and aids dust collection quite a bit. Also, (due to the airflow induced by the belt) the dust collection when the machine is used for radius work is still pretty good. I had originally planned on making an extension for the funnel to use when radius sanding but since the dust collection is better than anticipated I have not done so. I have two other modifications planned for this machine. The most beneficial will be to create a system so that I can bias the table. This would involve cutting an inch or so from the table support framework which would be a little difficult with the machine assembled. I would have to devise a new attachment for the table and a hinge for the motor end of the table. Since I don’t use the tilt mechanism anyway, I’ll bolt the machine in its 90 degree setting and build a table mechanism that does not go out of alignment when biased. The benefit of doing all this work is that the belt will have more even wear characteristics when operated with the table biased and is less likely to burn or develop "dull" bands. The next modification would be to replace the switch gear with either magnetic types or just better switches and possibly convert the motor for 220v operation. Closing While my impressions of the basic machine in general aren’t very encouraging or flattering, I would like to point out that a horizontal sander is an exceptionally handy tool; much more to than a small combination belt / disk machine. For almost $700, I don’t feel this machine and ones like it are very good values. For that amount of money, the dust collection, angle setting controls, and table movement should be much better than they are. It is unfortunate that the machine is no better than it is, the true value of this machine (as originally built) should be about $400. Because of the cost, at this point I am unsure as to whether or not I should have just built one from scratch or bought a bigger and better (more expensive) machine instead. The only recommendation I can make with regard to a horizontal sander is that this is as small of a machine I would ever want to use. The next step down is an 80 inch belt which is not quite long enough; six inches is the absolute minimum for belt width. |
| |
 |
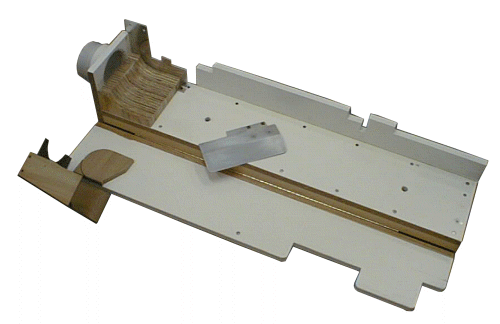
This picture below shows the dust shroud I made removed from the machine and laid out flat. The block used to keep dust from going to the back side of the shroud is visible in this view near the DC port, it is a lamination made of 3/4" plywood. The metal plate attaches to the shroud after it has been installed on the machine. The purpose of this plate is to deflect the airflow from the motor fan which would interrupt the flow created by the dust collector if this were not in place. |
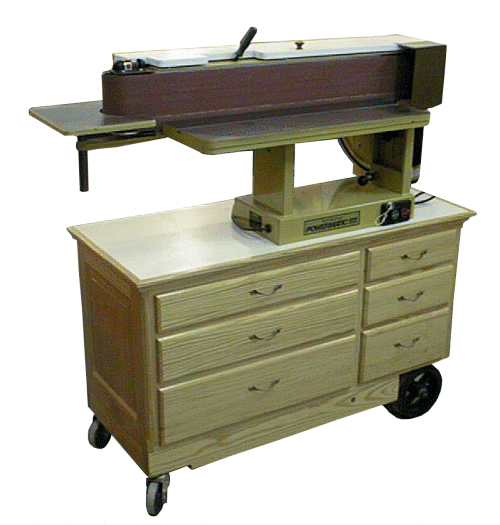
| This is a more complete view of the sander on its cart. The cart is a typical plywood drawer box that sits on a mobile platform, the box and platform are screwed together. Common face frame construction was used, the frame was made long on the ends to accept the raised panels that are applied at either end of the cabinet box. The asymmetrical drawer size was dictated by the size of drawer needed to store the belts for the machine. Each drawer uses a common corner mount glide made by Alfit. |
 |
 |
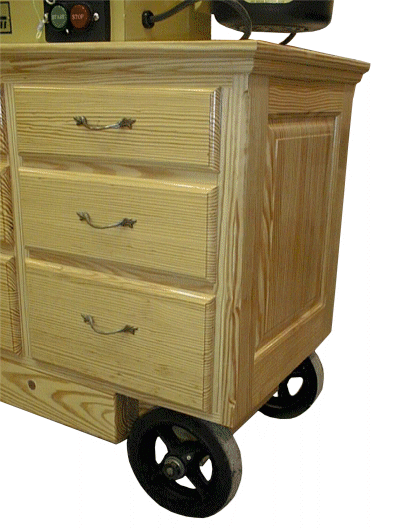
This is a close-up of the cabinet at the motor end. The fixed wheels are 8" diameter with roller bearings on a 1/2" axle. The castors on the front are 4" swivel types. The rolling platform is fairly simple and made of 2x lumber and plywood, there is a 1/4" dust cover on the bottom side. The platform was designed with these size wheels in mind; specifically, I wanted the fixed wheels to be under the cabinet so they would be less likely to catch on anything. The round dot in the bottom of the picture is a penny dated the same year I made this cabinet. This type of mobile base operates very well; I also like the look of this cabinet and would not hesitate to make others following this form. |