|
|
|
Unifence Jigs
 |
 |
 |
 |
 |
 |
 |
The following is a example of the few jigs I have made for the Unifence.
|
 |
In this view the Unifence is used as a router fence. I made a separate fence that is hollow on the inside with a cut-out for the router bit and a shop-vac sized hole in one end for dust collection. The jig attached to the top of the fence is a plastic feather board. |
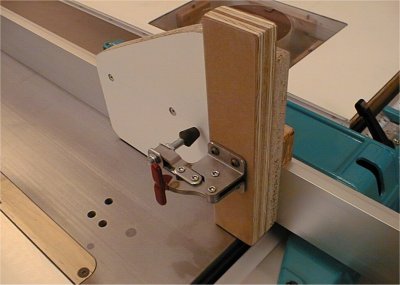
| Here again is the router fence but this time a stock pusher is fitted; this can be used for tenoning or other operations needing vertical support. For this jig, it is critical that the travel be in alignment with the fence. To accomplish this the fit of the carrier on the top is somewhat loose until locked down. When installed, the pusher side is held in contact with the fence face and the T-knobs are locked down. This simple procedure ensures the alignment is correct every time |
 |
| There is a piece of UHMW tape where the pusher contacts the face. This aids in alignment and reduces friction but it also slightly loads the drawer glide used to control movement, this makes it operate a little bit better. | |
 |
This view shows the router
fence rotated 90 degrees ccw and gives a good view of the fence attachment area. With this type of attachment, the standard fence can be removed and replaced with this router fence in less time than it takes to tell. The attachment is just a simple recess with flat bar stock screwed to the surface to capture the T-bolt of the Unifence head. |
| This is another fence used
solely as a stop block. This is especially handy if a sliding table is fitted to the
saw. The challenge with this fence is to make sure it is EXACTLY the same thickness
as the stock aluminum fence so that the rip fence scale will read true. To accomplish this, the fence is composed of two boards screwed together but with foam tape in between. The tape act as a spring pushing the two boards apart. This method allows the total thickness and fence - table angle to be adjusted with great accuracy. The fence is attached just like the one shown above. |
 |
| An easier but less aesthetic way of doing building this fence to serve the same purpose would be to omit the board on the face and use a screw instead, this is a little nicer to look at and use. | |
|
|
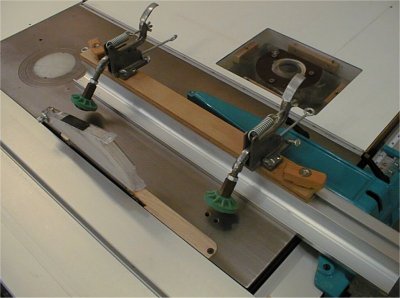
I've received numerous
requests for a picture of how I installed a pair of "board buddies" onto a
Unifence; this is how I did it. Due to the reach requirement the only way I could get them into a useable position was to use the fence in its low position. Both assemblies are attached to a board which is captured by one of the T-slots in the fence extrusion and secured with two knobs. |
| Using these on a Unifence will cause the fence to lift a little or quite a lot. On a normal saw one simply clamps the outfeed end down when the fence is in the desired position. As shown these are installed on my Hammer which has a 40" cast table so this cannot be done. As such, I don't use these anymore. | |
| Many people have the mistaken belief that the Unifence makes it hard to build jigs, particularly a tenon jig. This is one I made for a particular job and isn't developed 100% but it works just fine. On the back of the MCP board is a board with a rabbet the same depth as the width at the top of the Unifence. At one time I had thought of converting my tenoning jig from my old saw to run from the sliding table. This is a much simpler solution. |
 |
| I probably will build another tenon jig or two but I think I'll make them run on the Jointech fence instead, it has more of the precision one really desires for this type of work. | |
 |
 |
 |
 |
 |
 |
 |