|
|
|
Building a New Woodworking Shop
 |
 |
 |
 |
 |
 |
 |
Heating
| The shop is located in a cold
climate, I don't like working in the cold so that means I either abandon the shop in cold
weather or I heat it. I have a used small electric air heater in my previous shop
with good success but since the new shop is so much larger, I don't think that is the best
option for heat. Everybody who has it seems to rave about radiant floor heating so
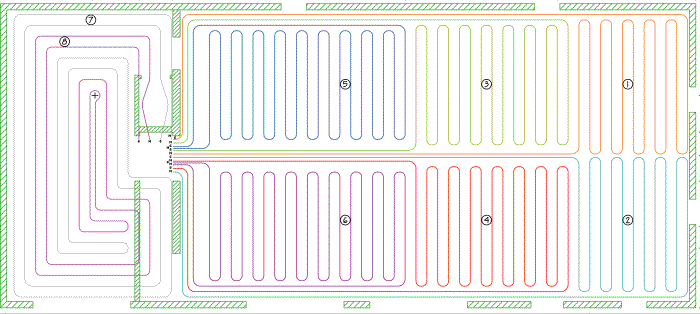
that is pretty much what I focused on exclusively. I don't have much experience with this method yet (October 2006) but I can share the basic plan. Radiant heat tubes need to be placed within the floor, in this case, the concrete. To make the system work the floor needs to be insulated pretty well to get the most benefit from the system. There are several similar theories or practices on how to insulate the floor. The suppliers I spoke with recommended full pad insulation as opposed to leaving an un-insulated "core" area" so that is what I went with. As I was doing my research, the recommended insulation material happened to correlate to exactly what a particular vendor happened to be supplying (imagine that). From what I have been able to gather, there are three types of insulation, rigid foam board, bubble wrap type products with foil, and a hybrid bubble wrap / foil / flexible foam product called Insultarp. The last two claim that although they are quite thin they provide significant insulation value due to the radiant barrier they provide. After careful consideration, I de-selected either of these two technologies in favor of rigid foam. From a common sense standpoint, the insulation situation is "conduction" not "radiation" so the radiant barrier argument never made much sense to me. Ridgid foam seem to be a much safer bet at the expense of being more difficult to install. I didn't get any quotes to subcontract out the heating so I would not realize any labor savings from the "easy" technologies. The material costs all seemed to be about the same. I also looked into several vendors for the heating supplies. There seemed to be several good on-line vendors for this stuff and they can ship complete or partial systems in varying states of assembly. Pretty much though, these things are going to be kits that require significant amount of on-site work to bring them into operation. The alternative to this level of owner involvement is a local turn-key supplier. It is my understanding that these run over $8 a square foot, possibly MUCH more, this excludes the concrete also. The basic heating system is comprised of a hot water mixture run through multiple loops of a special plastic tubing. The trick is to get the tubing in the floor in such a way that the loops are all pretty close to being equal. The vendor I chose for my system did not offer a detailed loop diagram, after a couple of iterations I came up with my own. |
| Below is a picture with the perimeter insulation installed with fill material to bring the grade up to the desired level. On top of the fill is a layer of sand that needed to be screeded level and to the exact height needed. A plastic vapor barrier is placed over this and then the bottom insulation goes on top of this. There were several obstacles to go around during all of these operations. The foam is easy to work with, is isn't hard to get it all in place but it is a LOT of work that takes a while to do. I sealed any gaps in the foam using several cans of great stuff foam. |
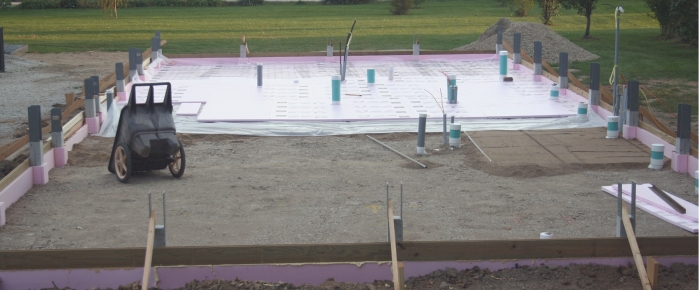 |
| There are actually two layers of foam around the perimeter. One below the rim board even with the exterior covering the outside face of the posts and another at the slab height on the interior. In places, that amounted to 3" worth of perimeter foam. The foam extends about 22" or so below the top of the slab. | |
| All the pex tubes run to a manifold
located at the center2/3 of the floor. It would be more ideal to have the manifold
even more centrally located but this is probably not all that bad. I probably
over-bought on the manifold system, this looks like a pretty good one. Also embedded
in the floor is a loop of tube for an optional floor temperature sensor. It was my
belief originally that these heating systems normally ship with a remote sensor thermostat
just for this purpose, I was mistaken however. Note that this is the location where the water and LP enter the building too. |
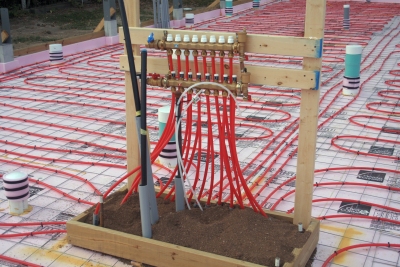 |
| I made a frame with holes located every so often the size of the bend tubes the pex runs through. The manifold is installed at this point of construction for two reasons. One is for a pressure test device to check for leaks prior and during the pour. The other is to keep the tubes in the proper orientation so they will not be at some bad angle after the concrete is in place as they are not moveable after that. | |
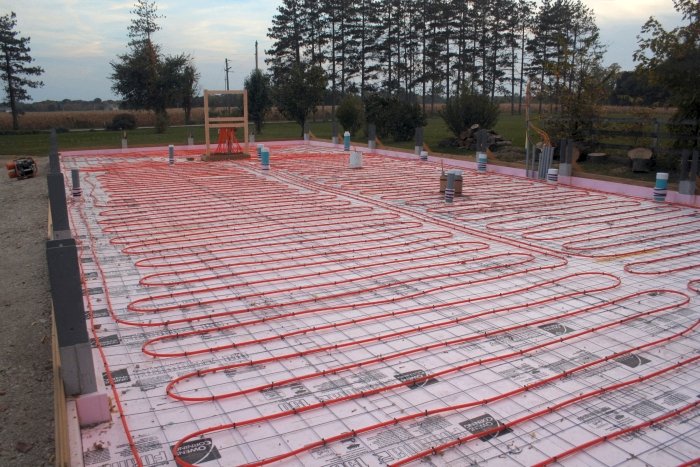
| A typical pex installation uses
wire mesh laid on top of the insulation which is basically used as a frame to tie the
tubing to. The tubes are laid out in loops with runs about 12" or so apart.
Approximately one gazillion zip ties were used to tie the tubing and grid together;
all of these had to be cut off as well to keep from interfering with the quality of the
pour. The concrete subcontractor strongly discouraged me against the plastic clips
used to fix the tubes to the grid. As he told me, this can and has resulted in
tubing becoming unsecured during the pour which he described as "a bad day".
Although a it was a lot of tedious work to use the ties, I wanted to avoid having
"a bad day" when it came time to put the crete over all this. Putting the tube itself down is a three person job. One to unroll, one to hand it down, and one to place and tie. I first put it down with only about 5 ties per individual loop just to get the stuff down then returned and put a tie about every foot or closer. When it was all done, the tubes and grid were all very rigid. During the pour itself I could not detect any movement as the create was being placed. |
 |
| As of this writing the heating system has been in operation for two heating seasons. Overall I am pleased with how it performs and the eveness of the heat. It doesn't change temperature very fast. I will update this page with some boring temperature data in the future. |
Return to the New Woodworking Shop Index
 |
 |
 |
 |
 |
 |
 |