|
|
|
 |
 |
 |
 |
 |
 |
 |
| Digital Domain The Digi-Fence is a digital tape measure for table saws. The company that makes this product makes the Digi-Fence to fit Unisaw and Biesemeyer (and presumably all Bessy clones) tablesaw rip fences. The company also makes digital measurement devices for miter saws, crosscut fences and other applications. This article deals with the use and installation of the Digi-Fence on a Unifence but the product would be applied in a similar manner in these other applications. The Digi-Fence consists of three primary components, the scale which is basically the "tape", the read head, and the display unit. The scale is screwed to the bottom of the Unifence rail and the read head slides along it sending data to the display unit via a small cable. |
 |
| Of some note is the method of shipment. The shipment is made in
one 4" PVC pipe for the scale and read head (already attached) and a cardboard box
for the display and hardware. Since the position quality is derived in large measure by
the quality of the scale, it is important that it be straight and undamaged. The 4"
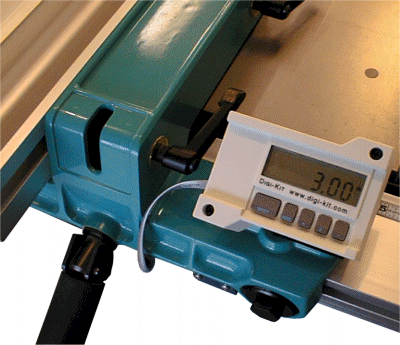
PVC pipe is a great way to ship this item. Accuracy For rip fence settings there are two basic accuracy's we are working with. The first is linear accuracy - how closely does the reading match the true distance. The second is repeatability - that is can you set the fence to a position, move it, and come back to the original setting. If you have good linear accuracy the repeatability should be very good as well. It is possible to have good repeatability but poor linear accuracy however. Most rip fences rely on a fixed tape measure and a cursor for the operator to use to position the rip fence to the desired width setting for a cut. Unfortunately it is difficult and expensive to make a tape much over 16" that is very accurate. These inaccuracies can lead to tapes that are easily +/-1/16" (+/- 0.0625") or more off at a specific reading. The larger the measurement, the more likely it is to be off from true. In the shop this can translate to some visible errors - errors which may be incorrectly attributed to the operator instead of the tool. For linear accuracy the Digi-Fence is guaranteed to be +/- 1/64" (+/- 0.0156"). That isn't too bad, certainly better than a cheap tape applied to a fence rail and probably good enough for almost all woodworking tasks. Based upon my testing I found the Digi-Fence to be right on at 3", 6", 18", 21" and 24" - basically it is right on every where all the time to about +/- 0.005" which is somewhat better than advertised. For repeatability the numbers were within about 0.006". This makes repeatability a little better compared to any Unifence class "unassisted" fence if you are diligently trying for repeatability; the difference being that a digital system is ALWAYS diligent. To date, I've used the system during some fairly high humidity and temperature swings. To my knowledge this has not affected the accuracy at all. To put the accuracy in perspective: Analog tape linear accuracy +/- 0.0625" (min approx.) Analog tape repeatability +/- 0.008" (approx.) Digi-Fence linear accuracy +/- 0.005" Digi-Fence linear repeatability +/- 0.003" In Use Although it may not seem like it would, a digital display does take some getting used to. I think this is mainly due to the fact that because it is accurate and always displays how close (or far) away you are from a desired setting, one is more inclined to try for that perfect setting. To say it another way, a tape measure is never very adamant about telling you that you are 1/64" off. Basically the system highlights the fact than unless the rip fence is equipped with a micro-adjust feature, there may be a fair amount of "tapping" to move the fence into the truly desired position. Because of the way the Digi-Fence is attached it will prevent the rip fence from being lifted off as it could be before the installation. You can get the fence off but either the read head will be removed in doing so or the bracket holding the guide clip must be removed. I would strongly recommend the latter since that lessens the chance that the read head would be damaged. If the fence were removed the system would need to be recalibrated. The Digi-Fence will display in fractions, decimal, and metric units and you can switch to any of them at any time. Although one can make the display numerical resolution in 16ths, 32nds, or 64ths, the display has markers showing 64ths all the time (in fractional mode) so even when it isn't numerically displayed, you always know where you are at to some high resolution. The display has a few buttons to control mode and whatnot. If the display is turned off when the fence is moved the calibration will not be lost, (not all digital measurement systems have this feature but I think it is vital). When the unit is turned back on, the correct reading will be displayed. You can re-reference the display where ever you wish without the use of any tools. You might want to do this to account for different blade kerf widths or if you happened to be using the saw fence / extension table as your router table. You can re-set zero using the buttons provided or scroll to a desired numerical value.. This last method is what I use in conjunction with a 123 machinist block to get a very accurate distance from the blade. The display can also be locked to keep errant fingers from inadvertently making adjustments to the reading. Except for locking, (and that's how you would want it) operating the display is pretty self evident. Summary
|
| Installation
I don't usually cover installation in my reviews but since this product requires more installation effort than the average accessory I'll cover at least the high points. As mentioned, the scale must be mounted to the bottom of the Unifence rail. To do this the rail should be removed from the saw. The scale is then laid onto the rip fence rail and the locations for several screw holes are found. After this is done holes are drilled and tapped for the supplied 6-32 screws. The aluminum Unifence rail is easy to drill and tap. The rail can be re-installed immediately after this step, go ahead and put the scale on beforehand. With the rail reinstalled I recommend locating the two holes for the read-head guide-clip on the Unifence head. What I did was assemble the bracket and guide-clip then hold it in position (capturing the read head appropriately) and mark the hole locations. These holes were then drilled and tapped as required. The last step is to locate the display unit. I installed the display on the right side of the Unifence where the cursor used to be. This would not allow the fence to be used on this side but since I can't do that anyway on my saw this was a non-issue. For those that would wish to retain "left-of-blade" capability with the Unifence you would have to mount the display in the center part of the head. I wish the display were smaller, this would allow more flexibility in mounting it. The instructions supplied go through all this but not in the detail I would like to see for something involving this kind of location and tapping work. The makers have reported that new instructions will be available soon. |
|
 |
|
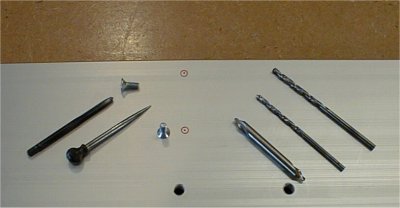
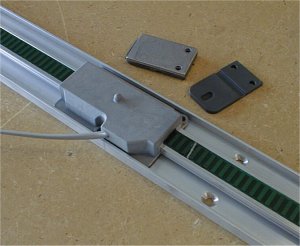
| The view above is of the scale and read head. The little plastic part laying next to it is actually what moves the read head along the scale, it is attached to the rip fence via some brackets not shown. | It is required to drill and tap some holes in order to install the system. I used a scribe as a mini-punch after the holes were located. I then used a center drill to get a pilot hole started then two drills to get to the proper hole diameter for the 6-32 tap. |
|
 |
 |
 |
 |
 |
 |
 |