LittleRat Review

Back to the LittleRat Index Page

LittleRat

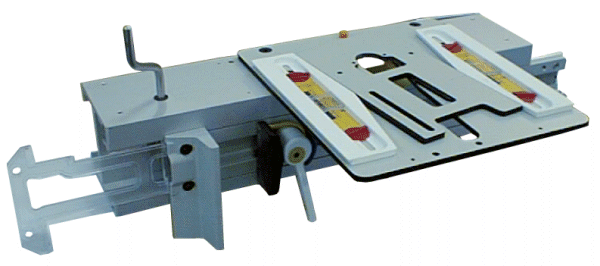
Impressions
The LittleRat is a smaller version of the WoodRat. The LittleRat looks unconventional but like a few other jigs and tools, it's unusual looks belie its fundamental simplicity.  The main principles behind making joints with the LittleRat is that you can:
A. Index the cutter from an initial reference point.
B. Control the cutter in the XY&Z axis.
C. Use the climb cut technique for smooth cuts with no tear-out.
D. See what you are doing.
Assembly
The LittleRat ships in a tightly packed box along with any accessories that might be ordered along-with. All the parts are protected and small items are separated into plastic bags.  There isn't much assembly involved with the LittleRat, a couple of glances at the instructions are all that's needed for proper assembly. Metric Allen wrenches are supplied for the bolts.

The LittleRat must be secured or mounted in order to be used. It is possible to clamp the tool to the workbench but the preferred method would be to mount it to a wall. A cleat hanger is described in the manual for doing just this. While I'm sure that method would work just fine, I would prefer to bolt it to the wall.

A thick spiral bound, shop-worthy manual is supplied with the jig. Overall the manual is good and describes how to make all the common joints with the jig. The manual is supplemented with some on-line addendum's and such via the WoodRat web site as well.   Due to the tool's uniqueness, the manual should be studied a bit before attempting any complex joints.
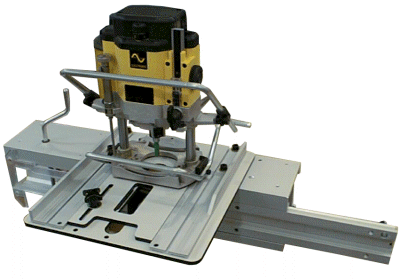
Operation
Unlike its bigger brother the WoodRat, the LittleRat uses a pointer to position for a cut. This, along with the size and the WoodRat's ability to use different degree dovetail angles are the major differences between the two jigs.

I initially thought the single clamp design would be a short coming compared to the larger WoodRat. I'm now of the opinion that this (for me anyway) is the more desirable of the two positioning methods. Instead of lining up a drawn image of the joint, one simply lines up the cursor with a drawn line. It should be noted that this only applies to the power feeding aspect, not the "pull" or "Y" axis movement.
LittleRat View from Underside
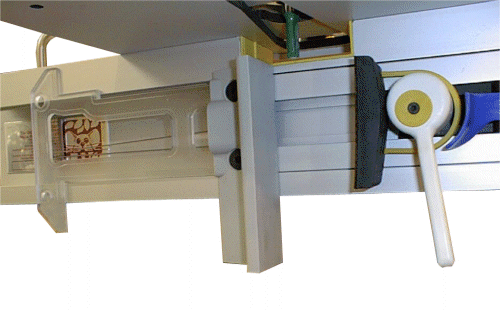
Once one gains a little familiarity with the tool, its operation becomes fairly straightforward and I found myself asking how I've "missed the boat" about this way of cutting joints for so long. Basically, one clamps the work piece up and moves it and the router in an XY manner until the joint is complete. Positioning is controlled by lining up the cursor with marks made on the tool or with marks on the work piece itself. It's actually very simple.
LittleRat Cursor There are two brilliant aspects of the jig that become obvious after a little use. The first is the X axis power feed that allows climb cutting to be done. The next is the fact that you can see what you are doing. Visibility is much greater for most operations compared to a traditional router table or template jig.

This is the "cursor" used by the LittleRat to position the stock clamped to the sliding carriage.  Basically all one does is position the carriage, mark a line with a pencil directly on the extrusion against the cursor; and then move on to the next position.

Cutting is basically the same.  The carriage is moved to a line and a cut is made.  The carriage can be moved left or right in any sequence because there is zero backlash (very clever by the way) on the movement of the carriage.

Joints
Any tool that is hard to setup or cuts sloppy joints isn't going to be very useful in woodworking. I initially wondered if aligning to pencil marks would be accurate enough for this task. As long as normal care is used, it is. In my own measurements (your results may vary) I've found that I can routinely position the machine to a line +/- 0.005" which is good enough for most joints.

Dovetails:
The LittleRat cuts 8 degree dovetails in either the through or half-blind variety. Unlike most other jigs, the work piece moves to each new cutting position instead of the router. Also unlike other jigs, cutting half blind (HB) joints is not really any different than through (TD) joints. There is a bit of hand-work with a chisel involved but it is minimal. Because TD and HB joints are cut using essentially the same process, this means that the LittleRat cuts HB joints that are REAL half-blind dovetails, not imitations thereof. All the other jigs that I am aware of cut imitation half-blind joints with rounded or beveled ends.

The dovetails can be laid out symmetrical or asymmetrical as well as variably spaced and variable width. The manual is not as clear as it could be when it comes to showing how dovetails are cut. However, once you have done both symmetrical and asymmetrical types, it's not too difficult; tightness of the fit can also be adjusted as desired.

Using the WoodRat line of HSS bits allows for true "hand-cut" proportions on dovetails. While there are a couple of dovetail jigs that claim to produce "hand-cut" looking joints, the LittleRat actually does deliver on this. The HSS bits are the key here.  (click here for a comparison)

Box / Finger:
This type of joint is fairly intolerant of error. Using the LittleRat, these joints can be cut on the X or Y axis as desired. They can also be gang cut. In the tests I have done, I've found that the joint produced is pretty tight. Basically, the jig produces box joints that are almost as precise as an Incra jig and certainly useable as long as they are not very wide. As with any router box joint jig, a proper size bit is crucial in avoiding a too-tight fit.

Mortise / Tenon:
Lap, bridal, and similar joints are for all intents and purposes in the same family as M&T so the description of one follows for the others. This joint also reveals the benefits of climb cutting more so than others.

Most of this type of work would be done on-end with the long side held against the face of the tool or the clamp. The only issue with this type of joint on the LittleRat is accurate positioning. This can be done using marks on the work piece itself or reference lines drawn on the cursor and base plate. Because one can see exactly what is going on, this type of joint is very easy to do on the LittleRat.

Doweling / Drilling:
Like box joints, doweling is fairly intolerant of error; you will most likely be using very few in any particular joint though.  I'm not a big fan of using dowels because there are so many other stronger joints available.  There are times though even for me where a dowel is the best joint for the situation.  Unlike some other doweling techniques, the LittleRat will limit the dowel size to a few applicable router bit diameters.  Aside from that, if you can place the stock under the LittleRat cutter, you can make some very accurately positioned dowel joints.  The entry holes will of coarse be very clean due to the router - you will want to use a spiral upcut bit of the extra-long variety.  Any problem encountered using this joint is most likely going to be due to the fact that dowels are not as uniform as the hole you will be making for them.

Edge Profiles / Grooves:
Slot, groove, trench, rabbet, and even sliding dovetails are all in the same family of joinery. Sliding dovetail ends would be cut in a manner just like a tenon. The sliding DT groove would be cut with the face of the stock up against the base plate. Because the Y axis stroke is so small only small frame joints can be cut, not for example a bookcase shelf slot.

There is no length limitation on the LittleRat. If long stock needs to be grooved or rabbeted, the stock does need to be supported because in this mode, the LittleRat operates exactly like an upside down router table.  Running long stock on the LittleRat is going to be more inconvenient that the same operation performed on a router table because it will be fighting gravity.  Since my router table is only one step away, I would never use the LittleRat for this.

Dust Collection
As mentioned, the preferred method for securing the tool is via a user made wall cleat. WoodRat has designed a mounting cleat that also incorporates a dust collection channel as well.  There is no collection when the cutter is on the operator side of the stock (unless the user provides it), only the back side can be collected upon.

I initially operated the tool clamped to my workbench with no dust collection at all. Based upon previous experience with template jigs, I was prepared to be covered head to toe in thin shavings after using the jig. To my surprise, this does not happen. This is partly because from the back, very little of the shaving get thrown into the air at all. A router certainly will create a lot of shavings in this tool however it is significantly cleaner overall than a template dovetail jig even with no collection at all.
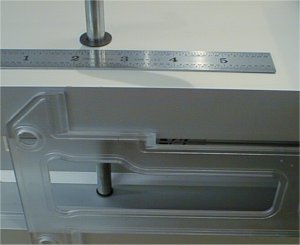
Capacity
The normal stock width capacity that can be clamped with the clamp system is 17 3/8" wide; with jigs this width can be extended.

The maximum joint making capacity in the Y axis is 8 inches. This means that a groove or similar joint can be made across the face of stock up to 8" wide. For typical joint this capacity is fine, for a bookcase or similar project, it is a bit small.

The opening in the base plate varies from 1 ½" to a little over 1" wide. This is adequate for any operation I'd care to attempt with the jig.

The total stroke (under the bit) that the sliding carriage is capable of is an inspiring 37 ½". That means (in theory) that with user-made jigs, a controlled cut can be made 37 ½" long. I haven't tested to see how straight or square the travel is.

The maximum "normal" cursor capacity is 6". The extended theoretical cursor capacity using the bottom channel and a shop-made cursor (as designed by WoodRat) is 30".
LittleRat Aluminum Guide Rails

Accessories
My unit was supplied with the Aluminum Guide rails, the miter box, plunge bars, and a selection of bits along with the demo video. The demo video is fairly well done and informative. It doesn't explain in detail exactly how to cut every joint type but it does give a good overview of its capabilities.

Aluminum Guide Rails:
These take the place of the plastic guides normally used and are now included as standard. Unlike the plastic guides, these allow only straight pulls in the Y axis, dovetails cannot be cut with them. These guide rails add quite a bit of rigidity to the jig. They also include a small T-slot that can be used which the plastic guides do not have.

Miter Box:
The miter box is nothing more than a couple of profiled MDF boards and some threaded rod. In addition to holding parts with their faces at an angle to the cutter, they also allow small parts to be held above the plane of the clamp used normally. While these items do work, it does take some considerable fiddling around to get things lined up; a shop-made jig will offer more in capability and convenience.

Plunge Bars:
The primary mode of operation a user will want is a quick and convenient plunge action on the router used in this system; the plunge bars deliver on the promise of one-handed plunge control. This I believe is more important (or at least hugely convenient) than it appears just looking at the system. This is because it makes for more fluid control of the cutting and stock movement.

Bits:
The WoodRat series of HSS dovetail cutters will not have the same life as the more common carbide tipped cutters but they do offer an advantage over them in that they are stronger which ultimately allows for smaller width pins to be cut however. They are not recommended for certain hardwoods like Hard Maple. The LittleRat is limited to using 8 degree cutters, carbide cutters from other vendors can also be used with the tool.

Summary
Woodworking is about making proper joints that fit and if exposed, look nice. It is a well known fact that the portable router is one of the most versatile shop tools. Coupling a Z axis (plunge) router with a XY positioning system that also allows the router to operate in a climb cut mode is one of the most effective joint making solutions on the market.

I was actually a little bit skeptical of the system when I first started using it. Now, the more I use it, the more I want to use it. There is a bit of a learning process when it comes to positioning and dovetails but this is easily mastered after a few practice joints.

There is no "one size fits all" solution when it comes to making woodworking joints. However, the LittleRat provides a very good platform for making a variety of joints. Compared to the several jigs or dedicated machines it could take to perform the same operations, I believe it is worth consideration.


In the interest of full disclosure WoodRat provided this product to facilitate this review.

Another article that may be of interest is a Joint Comparison chart listing the capabilities of several jigs and machines.