|
|
|
Hammer B3
Riving Knife Modification
 |
 |
 |
 |
 |
 |
 |
|
As pointed out in the review, the riving knife on my machine would not line up properly because the bracket which holds was not in alignment with the saw blade. One of the reasons I considered a European machine to begin with was the perception of better safety features. Upon examining the design of the riving knife, it became clear that there was very little possibility that this bracket assembly could ever be expected to hold a riving knife in proper alignment. It strikes me as odd that (with all the safety stickers placed on the machine) the company and regulatory bodies would consider this design acceptable. So here I am with a very expensive woodworking machine with a riving knife that can only be adjusted crudely with shims - to me this was unacceptable. To correct this problem I devised an adapter to hold the riving knife in place. Compared to the OEM knife holder, the new design will:
|
|
| The adapter is attached to the same bracket as the OEM knife holder. However, the new bracket is adjustable so that it can negate any misalignment in the OEM bracket arm. The new adapter allows the knife to be adjusted in angle with respect to the blade, parallel to the blade, and in-line with the saw blade. | 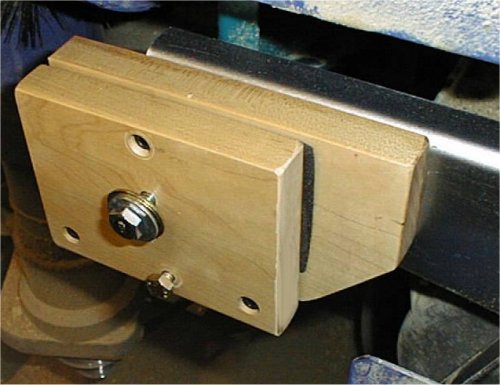 |
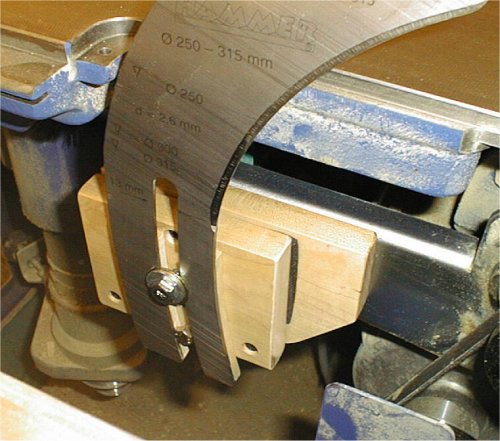
| At present,
this design does not allow the knife to be moved any closer to the blade than the OEM
bracket setting for a 13" blade. Since there is very little difference
between a 13" and 12" blade it would be a waste of effort to move it for that
blade change; there is some difference between the proper 13" position and a 10"
blade position but that is also relatively small. The knife can still be positioned
for height like the OEM design except that it is easier.
|
|
 |
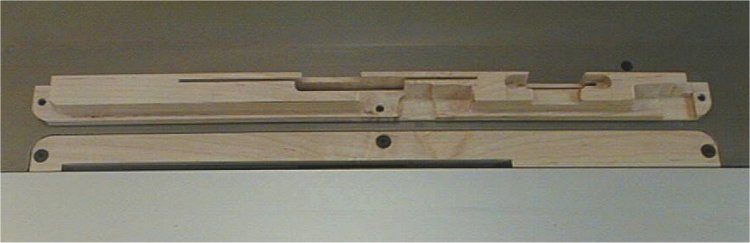
The adapter is actually two wooden plates. The back plate attaches to the OEM bracket arm and the front plate attaches to the back plate. To keep the adapter safely away from the sawblade, a 0.25" thick spacer was epoxied onto the back of the knife and trimmed to the knife profile. The thickness of the two blocks, the riving knife and its attached spacer combined is less than required to place the knife in line with the sawblade. |
| To allow the
knife to be aligned with the blade, springs are inserted between the two wooden blocks.
The "springs" used are two 3/4" thick pieces of foam weather stripping
tape; this brings the accumulated thickness of the assembly quite a bit to the left of the
blade with the foam uncompressed. By using the three alignment screws, the foam is
compressed and the knife is brought into alignment with the blade. The three point
mounting system allows for easy adjustment in the three planes required. This view shows the riving knife attached. It is held on by the 5/16-18 bolt, another 1/4-20 bolt is below that one and only set into the front block enough that the head will contact the metal section of the riving knife.
|
|
| This view shows the sawblade, riving knife, saw guard, and throat plate installed. The task of the riving knife spacer is clearly evident in this view. If not for the spacer, the sawblade would be touching the front block. The back of the riving knife also contacts the far side of the throat plate. However, there is some space for lateral adjustment. | 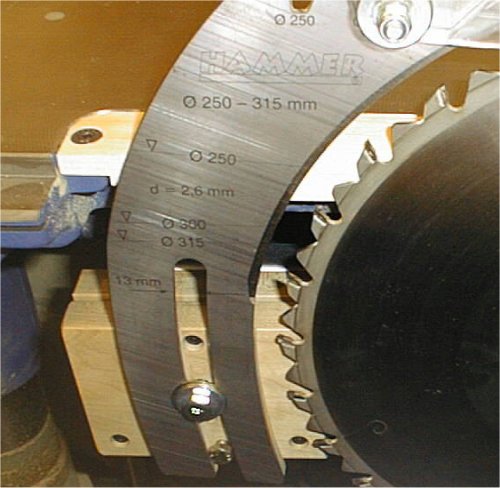 |
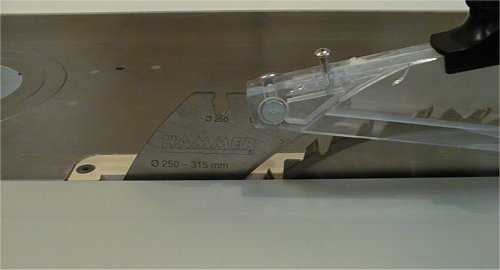 |
Because the blade guard is a safety device impacted by the riving knife I will describe a change I made to that component here as well. When I first started operating the saw with the guard installed, it seemed that the guard was responsible for trapping small offcuts which kept them near the sawblade. This in turn could cause them to be re-captured by the blade. |
| To try and
keep the guard from having a negative safety effect, I installed a screw into the top of
the guard which contacts the riving knife and raises the front of the guard off of the
table. Also of note is that the bolt assembly that holds the guard on is turned around 180 degrees as well. The reason for this is that its dual nut arraignment projects out from the guard quite a way which the crosscut fence was capable of hitting. To make the change I made a shallow counterbore and flipped the bolt around. It should be noted that raising the front of the blade guard in itself is a safety issue, do so at your own risk! |
|
| For offcuts about 1/2"
and smaller, the airstream around the blade would move the offcut towards the leading edge
of the blade or the piece would fall into the throat plate bevel to the right of the blade
and move towards the leading edge of the blade. Once the blade caught the offcut, it would fling the piece into the cabinet with a loud bang or even propel it on random trajectories outside the cabinet. After this had happened a few times I thought I needed to do something about it before this ended up in a broken throat plate or blade guard. I was particularly concerned about the blade guard, I thought the impact of the offcut might shatter it causing shrapnel. To solve the problem, I made a new throat plate. As can be seen, the clearance relief's on the underside of the throat plate are more complex than a typical cabinet saw part. The comparison throat plate is a full zero clearance type with relief's for a 10" main blade and a scoring blade as well, this example would not accept a riving knife. I also moved the sliding table over as close as possible to the iron table, this leaves only a small gap on the left side of the blade. The throat plate shown installed is a three-quarter clearance type that will allow blade changes without removal of the throat plate, unlike the example shown above it. |
 |
Notes:
|
 |
 |
 |
 |
 |
 |
 |