|
|
|
BT3100 Crosscut Fence Alignment
| Note: | The vast majority of cuts are made with the fence set at the 90 degree position. For reasons unstated, this alignment does not take into consideration the angle marks on the SMT. However, if the SMT travel alignment is within tolerance, the angle marks will most likely be very close to true after this alignment. In any event, my recomendation is to use some sort of measureing device instead of relying upon the angle readings of the SMT. | |
| Goal: | For
square cuts, the crosscut fence must be set 90 degrees to the direction of travel of the
SMT (NOT the blade). Note, this alignment is also true of standard miter gauge fences. The face of the crosscut fence should be perpendicular to the main table. This isn't critical for most cross cuts except when compound angle cuts are being done. |
|
| Tolerance: | The error should not produce a noticeable problem or error in a project. A good example would be +/- 1/32" for a base cabinet side 24" wide. The tolerance is based upon what the user can tolerate for out-of-square. | |
| Error Effect: | If the crosscut fence is out of square, it can often result in a double error stack-up in a project. For example, a 1/16" error can potentially result in a 1/8" error in a project depending upon how the parts are used and the cutting sequence. | |
| Process: | This
is primarily a dynamic process. While there are a number of good techniques that can be
used, the 5 sided cut is the method described here. This technique is an error-additive
process that requires no measurement tools or jigs and is very accurate. Select a piece of stock to use for the test, something about 12" square is a good size that will give the test a decent amount of resolution. The stock material should be stable and flat for the best results. |
|
| Set the fence perpendicular to the blade using the "Quick Stop" device. Place the stock against the crosscut fence and make a cut. Note, it is a good idea to have some reasonable amount material on the "waste" side of the blade. This ensures that the blade is in a stable state and that the test is being conducted under "normal" conditions. Note that I've labeled each side with a letter, this is the "A" cut. | 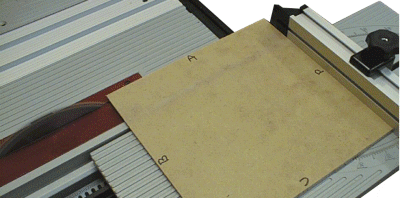 |
|
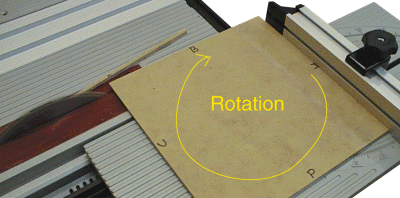
| Rotate the
stock 90 degrees by placing the fresh cut edge against the crosscut fence and make
another cut; this is the "B" cut. Repeat this step to make a cut on the
"C" and "D" sides. Note, extra care should be taken to ensure that
there is nothing between the stock and the crosscut fence to throw off the cut angle even
a little as it will affect the test. |
 |
|
| Rotate the stock again back to the original position for another "A" cut. Make a cut (this is the fifth cut) and save the cut off piece. | 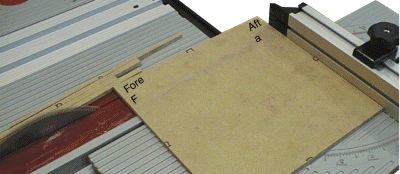 |
|
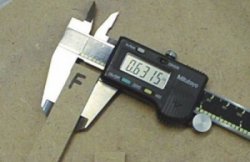
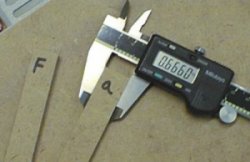
| If
you are going to do the measurement by feel or eye, take the cut off and break it in half.
The difference in width between the two ends IS the accuracy measurement. In this
particular case the stock was about 11.5" square, using the measurements and simple
math: 0. 6660" - 0.6315" = 0.0345" 11. 5" x 4 = 46" Error = square to within 0.035" (about 1/32") over a distance of 46" This means that if a piece 46" wide were crosscut the cut edge would be out of square by 0.035" relative to the reference face (against the crosscut fence). Of coarse the SMT is incapable of crosscutting this large of a piece of stock. However, by using this technique it's alignment can be checked at this high resolution. |
||
 |
 |
|
To actually
make an alignment adjustment:
|
|
|
| Ideally,
the crosscut fence will hold it's alignments as long as none of the parts it is attached
to are moved. If any are moved, the accuracy should be re-checked. Ideally, the crosscut fence will hold this alignment when the fence is removed and replaced. |
||