|
|
|
 |
 |
 |
 |
 |
 |
 |
|
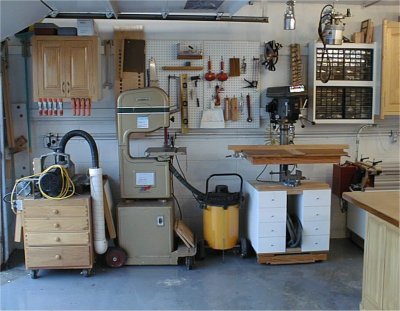
My woodworking shop is located in a standard two car garage; it is attached to the house and is accessible from the basement. The basement is not used as living space which makes it convenient to store materials and any overflow or assemblies from the shop area. The shop is tied to the house electrical system but has its own breaker panel. The space is heated with an electric heater in winter months, a ceiling mounted fan keeps the air circulating and a wall mounted air cleaner is used when the doors are closed. Not shown in the drawing is a 5hp air compressor located in an outbuilding about thirty feet from the shop. All of my machines (except the B3) and cabinets are
on mobile bases except for the main workbench. The mobile bases allow me to move machines
around to create space for large assemblies and to more easily clean the shop. The use of
mobile bases has also allowed me to evolve my shop configuration as well. It is not very apparent from the overhead view shown below but I have made some fairly significant changes when I switched from using a typical tablesaw to a combination saw / shaper machine. Compared to the previous layout, I have more open space particularly when the outrigger for the saw is in its stowed position. I have also gained quite a bit in convenience by having the shaper function set in a position where it can be used with a relatively small setup time. Previously, my shaper was in the "machine park" and not particularly handy. |
 |
 |
|
 |
 |
 |
 |
 |
 |
 |
This view shows the B3 to good advantage.
Along the wall are a number of shop cabinets that are attached using a French cleat
system. This allows me the flexibility of repositioning the cabinets or any of the
other items hung by it like such as jigs and accessories. Compared to the Unisaw Shop Tour, note that the North and West walls are now painted white, this brightened up the shop quite a bit. One of the reasons the cabinets were made using white Melamine was to keep the shop light as well. |
| The drawer cart under the open shelf cabinet is mobile and I use it as an outfeed or support table sometimes. Missing in this view from the previous shop is a 12" chop saw. One of the benefits of a sliding table I learned from the previous shop was that the work typically done with a chop saw is done on the tablesaw instead, the sliding table makes the chop saw somewhat redundant. I have been operating without a chop saw for quite some time now and don't miss it at all. | |
| In this view is the core power tool of my shop,
the Hammer
B3 Combination machine. Towards the right is the two-stage dust collector with
its attendant ductwork along the North wall. To hook the planer or jointer to the DC
system I use a 4" x 10' flex hose seen hanging from the door track. Next to the cyclone on the right is a small cabinet for saw blades and other saw related items. To the left of the cyclone is the wall attachment bracket I use to hang the LittleRat on the wall. Above it are several jigs associated with it. |
 |
 |
In this view the relationship between the bench,
work area, tool cabinet and other items can be seen. All the machines are on mobile
bases but the workbench is not. The use of mobile bases allows me to make more floor
space when needed and to clean the floor more easily. The placement of the jointer and planer is in a "machine park" area. This is compromise I've made to allow for flexibility. In good whether, I usually roll these two tools out onto the driveway when not in use. When I need to use the planer it is rolled a few feet to the left and plugged in, the jointer can be used in the position shown. If I had more room I would prefer to have these plugged in ready to go at all times. |
| This view shows part of the South wall of the shop. This
wall was also painted white and endowed with the French cleat system. The small cabinet towards the left was moved from the North wall to this side. I built three pegboard units that are hung from the cleat as well as a new cabinet to hold my small parts organizers. The tool on the drawer base located in the corner is my Performax thickness sander. The drill press is hooked up to the air supply, it uses a flex-loc hose to blow chips which is a nice capability to have when using small forstner bits. |
 |
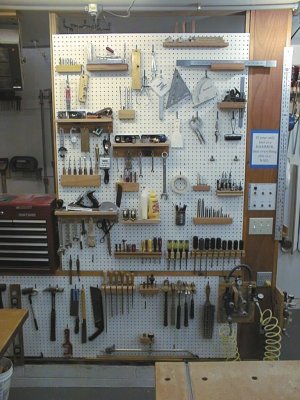 |
This is a view of the pegboard near the bench. Long ago I
was quite disdainful of the use of pegboard but if special holders for tools are built
such pegboard is actually quite useful. I keep my most frequently used tools out on
this board. Compared to the previous version of my shop this pegboard has also been
painted white. Also note the air supply in the lower right. I have two unregulated, one oiled & regulated, and one water trap / regulated outlets. Compressed air is nearly as useful as electricity. In the upper left corner can be seen the electric heater I use. |
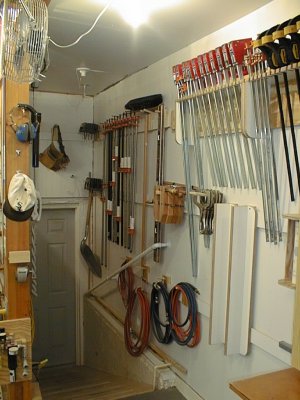
| This view is the short hall to the
basement. There isn't a lot of opportunity to use this space to good
advantage. I do hang clamps, extension cords, air hoses, and other gee-gaws
here. This hall is immediately behind the pegboard in the previous photo. This view does show the French cleat system I have installed on this wall, this is one of those ideas that I wish I had implemented from the very beginning, it offers a lot of flexibility in how the wall space can be used and reconfigured in a shop. |
 |
| I periodically move all the equipment out of my
shop and hose it out. This is the only way I've found to really get rid of all the
dust that accumulates over time, sweeping or vacuuming doesn't really get it. The shop layout you see here was arrived at over a long evolutionary process and I am sure it will continue to evolve over time. The "Words of Wisdom" article contains a lot of the things I have learned regarding shop layout as well as some other stuff. |
| Of course my shop doesn't always look as pristine as the photos above indicate. It's actually hard to see clutter even in this picture but there are about five gallons of chips on the Legacy mill and the workbench is covered in tools and pieces of the current project. |  |
 |
 |
 |
 |
 |
 |
 |
